Vue.js unit test cases with vue-test-utils and Jest
This article describes test contexts, from common to more complex ones, on a Vue.js stack. You may read TDD with Vue.js article as an introduction, which is mainly focused on methodology (Test Driven Development). This current article describes a wider range of test contexts based on Vue.js, using vue-test-utils helpers and the Jest testing framework.
1/ Jest
Jest is a testing framework developed and used by Facebook to test JavaScript code. Its main goal is to simplify test configuration. It integrates most of the tools developers would need to test an application (test runner, assertions, mocks, DOM traversing,…) while having a better developer experience than usual. Still, Jest is not perfect, and we could summarise its benefits and drawbacks. Benefits:
- All in one: easy to configure (default configuration with jsdom, babel,…)
- Snapshot testing (cf testing strategy in part 3)
- Good developer experience (CLI)
- Parallel execution for tests
Drawbacks:
- All in one: might do too much and give developers less choices
- Might have below average performances
- Can’t mock return value depending on parameter
Jest is often associated with React because of its origin and because it works directly out of the box with it. However, we can still take advantage of its features for other libraries/frameworks, like Vue in this example. Since few days, Jest does not need much configuration as it is now included in the Vue webpack boilerplate.
NB: We use a specific configuration file in our sample project, because this embedded configuration was not available at the time.
2/ Vue-test-utils
Vue-test-utils is a Vue official tool that contains helpers to test Vue components. It is the equivalent of Enzyme from the React world. As such, it provides similar API with a few minor differences. It’s mainly used to instantiate a component while stubbing subcomponents (shallow), finding elements in template, trigger events and easily mock plugins. In the following examples, we will further detail the main helpers that we use in unit testing. In case you lack some helpers from vue-test-utils, you can still access to the Vue instance through the wrapper: “wrapper.vm” (see examples of event emission and async tests).
3/ Unit testing strategy
A unit test is the smallest scale of test in development. It’s an automated test focused on a precise code portion by abstracting its dependencies. Its size allows for a quick feedback loop that eases TDD. With this definition, we can see that unit testing approach is subjective, but two criteria seem to be predominant: unit tests should be fast enough for TDD and isolated. Nowadays, all modern JS front-end frameworks or libraries (Vue, React, Ember, Angular, …) are based on components. That’s why we could say that the most atomic unit is a component, without their dependencies. Moreover, Vue components don’t need an actual browser to be rendered, so we can make fast assertions on their templates thanks to jsdom (used in Jest).
With this in mind, we elaborated a unit test strategy based on our technical stack:
- Our unit test scale will be a component, with its template
- We will mock external dependencies (like axios) thanks to Jest
- We will mock subcomponents thanks to vue-test-utils “shallow”
- We will test static elements of the template (class names, html structure, …) with Jest’s snapshots
- When possible, we will interact with the component as a User would by triggering events like click, thanks to vue-test-utils “trigger”
- When possible, we will make assertions on the template, thanks to vue-test-utils “find”.
This unit test strategy allows us to be more focused on the component’s functional behaviour than its technical implementation.
4/ Examples
In the following examples, “my-code-file.js” holds implementation code and “my-code-file.spec.js” holds test code.
You can find all these different examples in the following repository.
4.1/ Common test cases
4.1.1/ Data initialization of a Vue component
Here, we test the “message” data of a “Hello” Vue instance. By default, we want “msg” to contain “Welcome”. In the test, we use the “shallow” function of vue-test-utils. “Shallow” renders the component and stubs the subcomponents if any. It returns a Wrapper instance, which contains the mounted component and helpers from vue-test-utils.
Hello.spec.js
it('should contain default message', () => { // when const wrapper = shallow(Hello);
// then const title = wrapper.find('h1'); expect(title.text()).toContain('Welcome'); });
Hello.vue
<template> <div class="hello"> <h1>{{ message }} {{ name }}</h1> </div> </template>
<script> export default { name: 'hello', props: { name: String }, data () { return { message: 'Welcome' } } } </script>
4.1.2/ Data update of a Vue component
We want to ensure that our template uses the “data” values of the Hello component, and not hard-coded values. Here, we test the “message” data of a “Hello” Vue instance after an update. We use “shallow” as in test of 4.1.1. “setData” method allows updating the data object.
Hello.spec.js
it('should update h1 title when message data is changed', () => { // given const wrapper = shallow(Hello);
// when wrapper.setData({message: 'world'});
// then const title = wrapper.find('h1'); expect(title.text()).toContain('world'); });
Hello.vue
Same implementation as in test of 4.1.1.
4.2/ Static properties and snapshots
Snapshot is a tool provided by Jest. We use it to detect UI changes of static elements. At first, it renders an HTML structure with the actual Vue template. Then, each time the test is executed, it will render the Vue template again. Finally, it will compare the two last rendered HTMLs, and expect them to be identical. This tool is used for regression testing, not in TDD.
Hello.spec.js
it('should match snapshot', () => { // when const wrapper = shallow(Hello);
// then expect(wrapper.element).toBeDefined(); expect(wrapper.element).toMatchSnapshot(); });
Hello.vue
Same implementation as in test of 4.1.1.
Snapshot: Hello.spec.js.snap
// Jest Snapshot v1, https://goo.gl/fbAQLP
exports[`Hello.vue should match snapshot 1`] = ` <div class="hello"
<h1> Welcome </h1> </div> `;
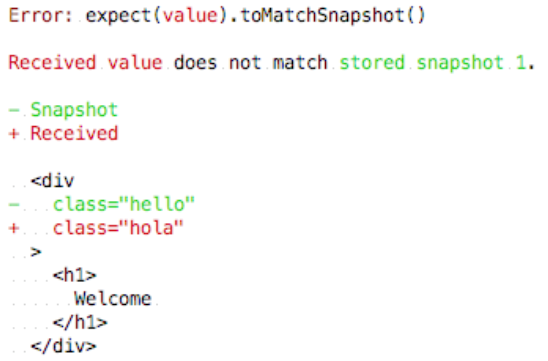
Example of a failed snapshot test
Here is an example of a failed snapshot, caused by the change of a CSS class in the template.
4.3/ Native events
The following example shows how to test a native event. We render the Vue instance using “shallow” and we retrieve the event emitter using “find”. Here, we want to retrieve from the DOM the button we want to simulate a click on. Then, we fake the event emission by calling the “trigger” method on the event emitter. This method comes from vue-test-utils and takes the name of the event as an argument.
You can take a look at the trigger documentation.
ButtonCounter.spec.js
it('should increment counter on click', () => { // given const wrapper = shallow(ButtonCounter); const button = wrapper.find('.test');
// when button.trigger('click');
// then expect(button.text()).toEqual('1'); });
ButtonCounter.vue
<template> <button @click="incrementCounter" class="test">{{ counter }}</button> </template>
<script> export default { name: 'buttonCounter', data () { return { counter: 0 } }, methods: { incrementCounter: function () { this.counter += 1; } } } </script>
4.4/ Custom events
4.4.1/ Emit a custom event
This example shows how to test a custom event. At first, we render the Vue instance using “shallow”. Then, we simulate the action that will emit our custom event. Finally, we create a spy listener on the custom event we want to test. Here, “increment” is our custom event. It is supposed to be triggered by clicking on the “.test” button. The assertion will focus on the call of the listener.
ButtonCounter.spec.js
it('should emit an event increment on click', () => { // given const wrapper = shallow(ButtonCounter); const button = wrapper.find('.test'); const spy = jest.fn(); wrapper.vm.$on('increment', spy);
// when button.trigger('click');
// then expect(spy).toHaveBeenCalledTimes(1); });
ButtonCounter.vue
<template> <button @click="incrementCounter" class="test">{{ counter }}</button> </template>
<script> export default { name: 'buttonCounter', data () { return { counter: 0 } }, methods: { incrementCounter: function () { this.counter += 1 this.$emit('increment') } } } </script>
4.4.2/ Handle a custom event
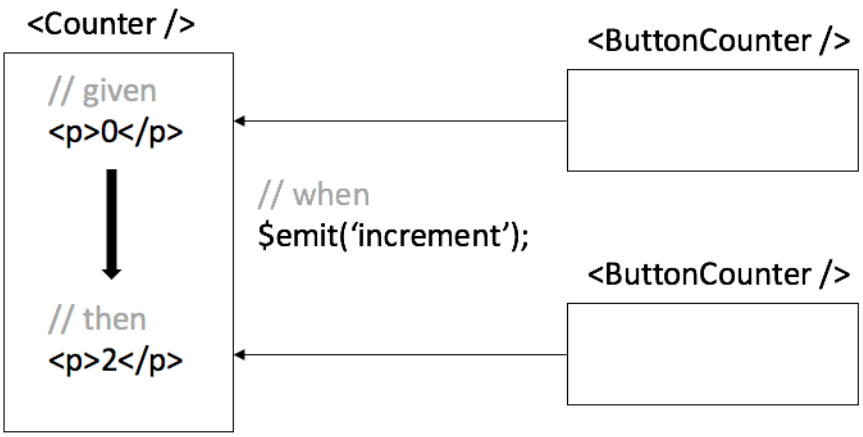
The goal of this test is to check the reception of a subcomponent’s event by the parent component. The action of the test is to emit the event by the subcomponent, using the $emit instance method. We have to use $nextTick to wait for the DOM update caused by the “increment” event We use “async” and “await” because $nextTick returns a Promise. Finally, we can write the assertions on the updated DOM.
You can take a look at the $emit documentation and $nextTick documentation.
Counter.spec.js
it('should increment counter on event increment from either buttons', async () => { // given const wrapper = shallow(Counter); const buttonCounters = wrapper.findAll(ButtonCounter);
// when buttonCounters.at(0).vm.$emit('increment'); buttonCounters.at(1).vm.$emit('increment'); await wrapper.vm.$nextTick();
// then const paragraph = wrapper.find('p'); expect(paragraph.text()).toEqual('2'); });
Counter.vue
<template> <div class="test"> <h1>counter</h1> <p>{{ total }}</p> <button-counter @increment="incrementTotal"></button-counter> <button-counter @increment="incrementTotal"></button-counter> </div> </template>
<script> import ButtonCounter from '../ButtonCounter/ButtonCounter'
export default { name: 'counter', data () { return { total: 0, }; }, methods: { incrementTotal () { this.total += 1; }, }, components: { ButtonCounter, } } </script>
4.5/ Async Lifecycle Hook
We want to show how to test instructions in a lifecycle step. In this test case, we will test instructions in the “created” hook. We use an external API (http://www.mocky.io/v2/5a01affc300000da45fac0cf) to get a number to initialize the counter and we use the axios dependency to perform HTTP requests. We can mock the external dependency using jest.mock(). It works by hoisting the mock to replace all calls to this dependency (‘axios’). Don’t forget the “mockClear” before each of your test to guarantee their independence. We have to use $nextTick because we can’t use the promise returned from axios in an async lifecycle hook.
Notice that Vue auto-binds the component’s context in the “created” function. That is why we can access to the data counter in the “created” hook.
You can take a look at the lifecycle documentation.
ButtonCounter.spec.js
import {shallow} from 'vue-test-utils'; import axios from 'axios';
import ButtonCounter from '../ButtonCounter';
jest.mock('axios', () => ({ get: jest.fn(), }));
describe('ButtonCounter.vue', () => {
beforeEach(() => { axios.get.mockClear(); axios.get.mockReturnValue(Promise.resolve({})); });
it('should set counter to API value on component creation', async () => { // given const response = { data: 11, }; axios.get.mockReturnValue(Promise.resolve(response));
// when const wrapper = shallow(ButtonCounter); await wrapper.vm.$nextTick();
// then expect(axios.get).toHaveBeenCalledWith('http://www.mocky.io/v2/5a01affc300000da45fac0cf'); const button = wrapper.find('.test'); expect(button.text()).toEqual('11'); }); });
ButtonCounter.vue
<template> <button @click="incrementCounter" class="test">{{ counter }}</button> </template>
<script> import axios from 'axios'
export default { name: 'buttonCounter', created () { axios.get('http://www.mocky.io/v2/5a01affc300000da45fac0cf') .then((response) => { this.counter = response.data }) }, data () { return { counter: 0 } }, methods: { incrementCounter: function () { this.counter += 1; this.$emit('increment'); } } } </script>
NB: for readability purpose, the API is directly requested from the component. This is a bad practice. In production code, we recommend to export this API call in another service (Single Responsibility Principle).
Conclusion
Now, you are more familiar with Vue.js, vue-test-utils and Jest. You can easily extrapolate from the given examples and official documentation for other test contexts. For instance, we chose to ignore "mount" helper, which allows integration tests by instantiating a component with its subcomponents.
A component-based framework encourages to test through the DOM and user interactions since it strongly couples View and Controllers concepts of the MVC paradigm. That's why these examples focus on the component’s functional behaviour rather than its technical implementation.
This unit test strategy was designed by all the team members and fits our test definition and needs:
- fast to write
- fast to execute
- isolated (different than end to end tests)
- wider coverage than usual unit tests (add tests on template logic)
Technical reminders:
- jest.mock(): mock external dependencies
- shallow(): mock subcomponents
- snapshot: test static elements
- trigger(): trigger user interactions
- wrapper.find(): find DOM element to make assertions