Mutation Testing, a step further to the perfection
Mutation Testing
Usefulness of unit tests is no longer discussed. They are essential in conception of a quality application. But, how can we assess their relevance?
A code coverage indicator up to 100% doesn't mean the code is 100% tested. This is just a view of executed code during unit tests execution.
The technique described here will allow you to have more confidence in your tests. This is a two step process: first mutants generation and then bloodshed of them. WTF?

Mutant generation
Goal of this step is to generate mutants classes from your business classes. What do you need?
First of all, business code on which you want to evaluate your tests relevance.
Next, a pool of mutations. A mutation is a change in source code. For example, the switch of an operator. Here are some examples:
- + ► -
- * ► /
- >= ► ==
- true ► false.
- suppression of an instruction
- etc.
Strictly speaking, generation consist in parsing every instruction of your code to determine if it is possible to apply some mutations. If true then it will generate a new mutant. In the next exemple, for the defined mutations pool and the specified code, process will give two mutant classes.
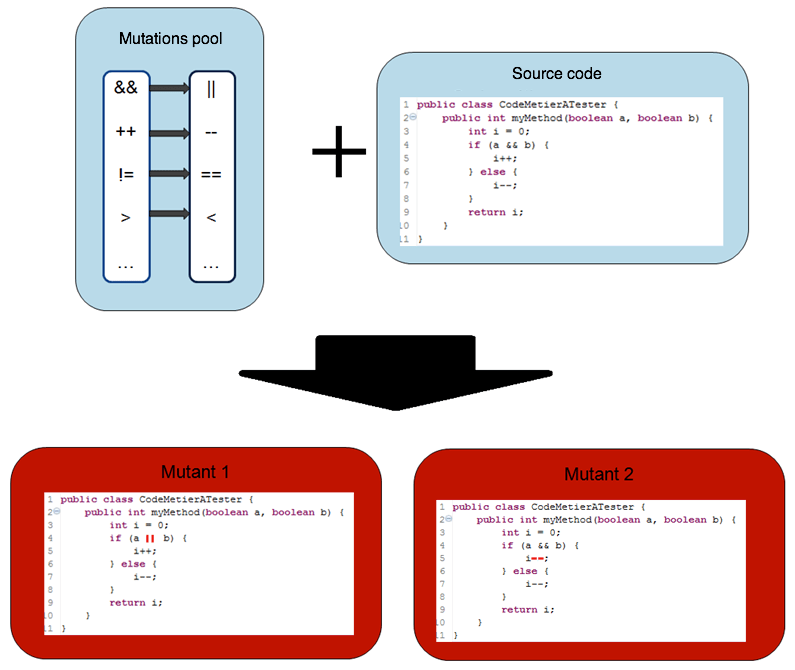
Note that this process can use a lot of resources. When code to mute has a big amount of instructions and when mutations pool is consequent, number of generated mutants quickly get big.
Process of mutants generation is now done. Mutants are saved waiting for the next step: bloodshed!
Mutants bloodshed!
Bloodshed is the best word I found to describe the second step of this technique.
During the first part we have generated a big amount of mutants, but mutants are dangerous, Kill 'Em All!
So goal of the game will be to eliminate as many as possible.
What kind of weapon do we have? Unit tests of course! User's guide:
- Make sure that all your tests of your unmuted business code pass
- Take all your mutants one by one
- Place them in front of a wall shot ( or in your classpath but it is really less classy)
- Shoot a salve of unit tests
- Count the deads
Report / analysis
For one given mutant, there are two possible results.
- All tests are still green
- At least one of the test is now red
Usually we want tests to be green, but here we want them to be red, which is the color attesting the death of our mutant!
Indeed if at least one test fails it means our tests are able to detect modifications of business code. On the other hand, if all tests are still green, the mutant outlives, it is invisible for our tests.
One surviving mutant is potentially a missing test!
Restrictions
The principle is simple, but the full analysis can be tedious. Indeed as mentioned in the first part, you can have a very large amount of mutants.
Lets take an example, 8000 mutants were generated in the first phase.
During the carnage, 95% of them were killed (God rest their souls). There are still 400 mutants. Doing a manual analysis for each of them is expensive. And the fault may not be due to our unit tests. Indeed, as in all battles, there are enemies tougher and more cunning. Here they are called "equivalent mutant".
An equivalent mutant is a mutant that changes the syntax of the source code, but not its semantics. As a result, it will be impossible to create a unit test which can detect it.
Source code:
int index = 0;
while(...) {
    ...;
    index++;
    if (index == 10) break;
}
A mutation from "==" to ">=" will produce the following equivalent mutant:
int index = 0;
while(...) {
    ...;
    index++;
    if (index >= 10) break;
}
In this example it is clear that the output condition of the loop remains the same.
Which tool?
This technique is not new, it was designed in 1971 by Richard Lipton. Its expansion was restricted by the heaviness of the process. The increase computer's power has made the "mutation testing" more accessible.
Ok, interesting concept. How can I use it on my project?
Unfortunately available tools in Java's world are far from being industrialized.
The pioneer MμJava is not based on JUnit as antecedent to it. Its replacement MμClipse only supports JUnit 3 and is no longer maintained. Jester as for it, is laborious and requires a complicated configuration; plus is not maintained anymore.
The best tool I could find is Javalanche. It incorporates and combines all the advantages of previous tools, ie:
Selective mutation:
A small number of mutations well selected is sufficient to have accurate results without generating too much noise.
Mutant schemata:
To avoid too many class version. The mutant schemata, the program keeps multiple mutations each guarded by a "runtime flag." Ref. [3]
Coverage data:
All tests do not pass on each mutant. To avoid running irrelevant tests on a mutation, coverage data is collected. Then are executed only tests relating to the mutation.
Manipulate bytecode:
The generation of mutants is performed directly at the bytecode level avoiding recompilation and time-consuming.
Parallel execution:
It is possible to parallelize the process, WHAT.
Automation:
Javalanche, unlike other tools, requires very little configuration. Simply configure the test suite to run and the package of classes to be mutated.
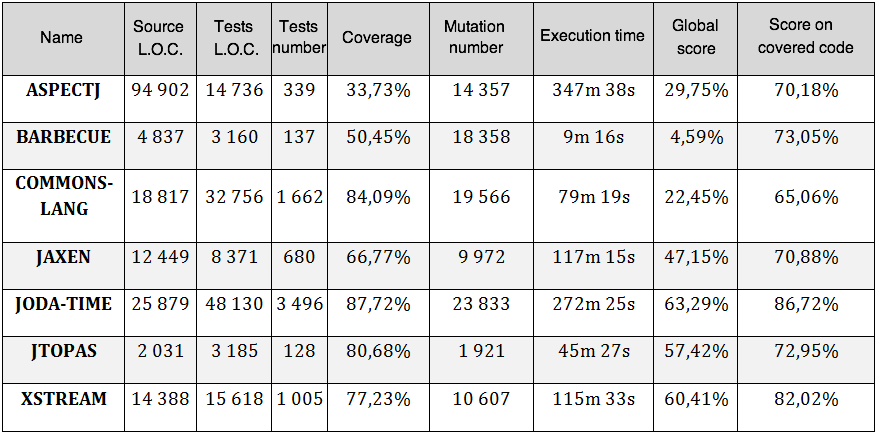
To prove what they say Javalanche designers have realized the following benchmark:
In real life
Javalanche seems to have been tried and tested out. So I submit it to constraints on real project. The results I obtained are positive despite some difficulties in realization. After a period of substantial ownership and resolution of some conflicts with my project classpath, here are my conclusions:
- for 10 classes and a total of 1000 LOC, the process takes 1 minute
- possibility of executing the process with both unitary and integration tests
- integration with frameworks like Spring and Hibernate is possible
- integration with mock frameworks (EasyMock) is possible, but with restrictions. Indeed, it was impossible to run the process in one time on both class A and B, if the tests for a Class B use a mock A. Without digging further, I think that by "proxyifier" classes too much, the tool is "lost" in the classpath (A, A mutated, A mocked, etc ...)
But most important is that it has revealed some non-tested and criticisms cases.
Conclusion
This technique is a step closer to perfection.
But to use it, you need to be in a high quality approach. Testing should already be at the heart of your development process, otherwise results represent a too heavy load analysis. If you are one of those for whom coverage indicator has reached its limits, ponder this Dr. Robert Geist's quote:
If the software contains a fault, there will usually be a set of mutants that can only be killed by a test case that also detects that fault.
Unfortunately, current tools, even Javalanche, do not seem quite industrialized. When will we have a Maven plugin that would allow us to follow the rate of killed mutants for each build?
Wanna play?
Want to see how it works? Here is a small sample describing how you can complete your unit tests with this method.
Lets start with a 100% covered class:
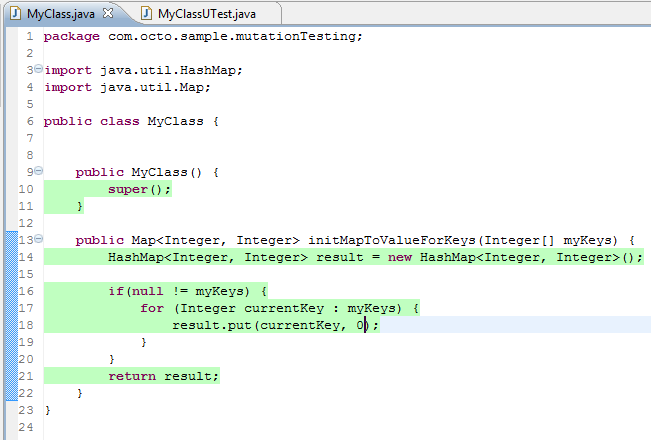
The method initializes a Map and add an entry for each key passed as parameter by assigning the value 0.
After a first pass, Javalanche gives us this report:

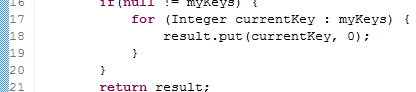
In the left section, you can see that a simple class generates 8 mutants, but also that there are 3 survivors. In the right side, note that in line 18, there is the rub.
Whether we increment or decrement the constant, tests continue to pass. Let's see:
Method's tests:
package com.octo.sample.mutationTesting;

public class MyClassUTest {

	@Test
	public void initMapToValueForKeys_WithNull_ShouldReturnAnEmptyMap() {
		// setup
		MyClass myCLass = new MyClass();

		// action
		Map myMap = myCLass.initMapToValueForKeys(null);

		// assert
		assertNotNull(myMap);
		assertEquals(0, myMap.size());
	}

	@Test
	public void initMapToValueForKeys_WithGoodParams_ShouldReturnAMapOfTheRigthSize() {
		// setup
		MyClass myCLass = new MyClass();
		Integer[] myKeys =new Integer[] {35, 84,8000};

		// action
		Map myMap = myCLass.initMapToValueForKeys(myKeys);

		// assert
		assertNotNull(myMap);
		assertEquals(3, myMap.size());
	}
}
Indeed, we check size of returned map, but not the initial value. So we add a test:
@Test
public void initMapToValueForKeys_WithGoodParams_ShouldReturnAMapWithGoodValues() {
	// setup
	MyClass myCLass = new MyClass();
	Integer[] myKeys =new Integer[] {35, 84,8000};

	// action
	Map myMap = myCLass.initMapToValueForKeys(myKeys);

	// assert
	assertNotNull(myMap);
	assertEquals(3, myMap.size());
	assertEquals(new Integer(0), myMap.get(myKeys[0]));
	assertEquals(new Integer(0), myMap.get(myKeys[1]));
	assertEquals(new Integer(0), myMap.get(myKeys[2]));
}
Lets relaunch Javalanche: 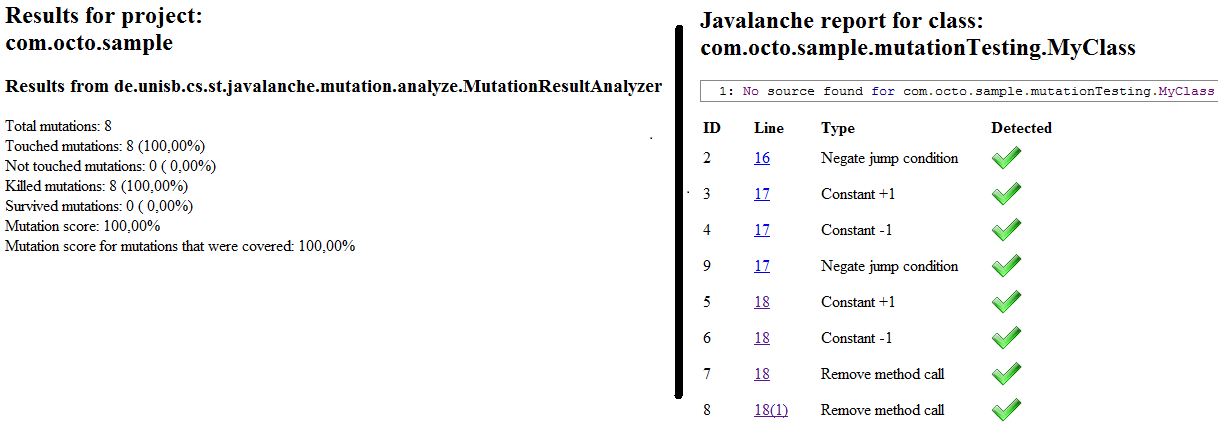
Good job!
Want to try? To realize this sample, follow these steps:
- set up maven and Ant
- get and unzip Javalanche
- unzip and build the sample (maven install)
- edit Javalanche.xml file which is at the project's root. Changes the first property and have it point to the directory where you extracted Javalanche
Then just run Javalanche by executing the following command:
ant -f javalanche.xml -Djavalanche.maxmemory=1024m mutationTest
Références
[1] - Javalanche: Efficient Mutation Testing for Java
[2] - Should Software Testers Use Mutation Analysis to Augment a Test Set?