JenkinsX – new Kubernetes dream? Part 2 [Technical!]
Alright, stranger! As we pass through the stage of basic Jenkins X overview in our first part , we are ready to go to infinity and go beyond the general application of Kubernetes environment. In this article, we are going to step further into Jenkins X world, by going through a step-by-step setup process and creating quickstart project. Furthermore, you will get an overview of what is going on in the background, detailed description of Git flow, release management and magic behind deployment automation. Please, be advised, that following tutorial is based on local Minikube Kubernetes cluster for simplicity and clearer understanding.

Considering a tough journey is ahead, I will give you a basic set of definitions to solve most of the problems. Try to remember all of them! Word by word. I'm not joking!
| Term | Definition |
| Helm | Kubernetes Package Manager |
| Tiller | Helm server side in Kubernetes Helm packages |
| Pod | A group of one or more containers which share storage, network and contain |
| Node (minion) | Worker machine which runs Pods |
| Minikube | Single-node Kubernetes cluster |
| NGROK / Localtunnel | Utility to expose localhost to the web |
| chart | Application definition for Kubernetes |
| Chartmuseum | Helm Chart repository |
| Nexus | Artifact repository manager |
| Docker registry | Docker image repository |
| MongoDB | NoSQL database |
| Ingress | Allows external users and client applications access to HTTP services |
What will be required for successful completion of this mission:
- MacOS with brew package manager ( https://brew.sh gold http://jenkins-x.io/getting-started/install/ for other platforms )
- VirtualBox, VMware Fusion, or HyperKit (recommended) for virtualization purposes.
- Command-line tool for Kubernetes management - Kubectl.
- Single Kubernetes cluster Minikube .
- Huge Swiss Army knife. Wait ... Wrong tutorial. No need for it.
Jenkins X installation
In this part, we will explain how to install Jenkins X (JX) on the local Minikube Kubernetes cluster. Once everything is set-up, we can catch the wild JX with a help of brew:
brew install jx
Once JX has been successfully captured, we can interact with it via CLI tool.
Our first step to initialize JX pipeline is to create a cluster based on Minikube. To do so, we need to invoke:
jx create cluster minikube -local-cloud-environment = true
The previous command will trigger setup and configuration qui will prompt for ::
- Amount of RAM allocated to the VM minikube (by default 4096 MB)
- Number of CPUs allocated to the VM minikube (by default 3)
- VM driver (it is recommended to use hyperkit instead of xhyve, since it will be deprecated soon)
As a part of the setup, Jenkins will install Tiller and Helm. During the next stage, the JX install will prompt for Git credentials for CI / CD. After that, the installer will create Pods for:
- Chartmuseum
- Docker registry
- Jenkins
- MongoDB
- Nexus repository
The default admin password will be displayed, which is used by all services. In case you clear the terminal without capturing the password, it is possible to retrieve it in BASE64 format and decode it. Run command to display secret for a particular JX service :
kubectl get secret jenkins --namespace = jx -o yaml
After that, staging and production repository environments will be created locally and pushed to specified Git. Each has the following structure:
.
├── Jenkinsfile (Jenkins buildscript)
├── LICENSE
├── Makefile (Helm package builder script)
├── README.md
└── approx
├── Chart.yaml (Wrapper for Chart application)
├── requirements.yaml (Track file version)
├── templates
└── values.yaml (Ingress exposure configuration)
So, what has happened after installation?
We got a complete set of solutions with different services .
All services are hosted on Minikube. In addition to the standard default , kube-public and kube-system namespaces, JenkinsX created jx-production , jx-staging, and jx (development) environments. To get a list of all available environments we can run:
jx get env
It is worth to note, that only staging and production environments contain a Git repository address, which point to a remote. Development environment is created only for a context of development tools. Our team asked the question to lead JX developers and got reply:
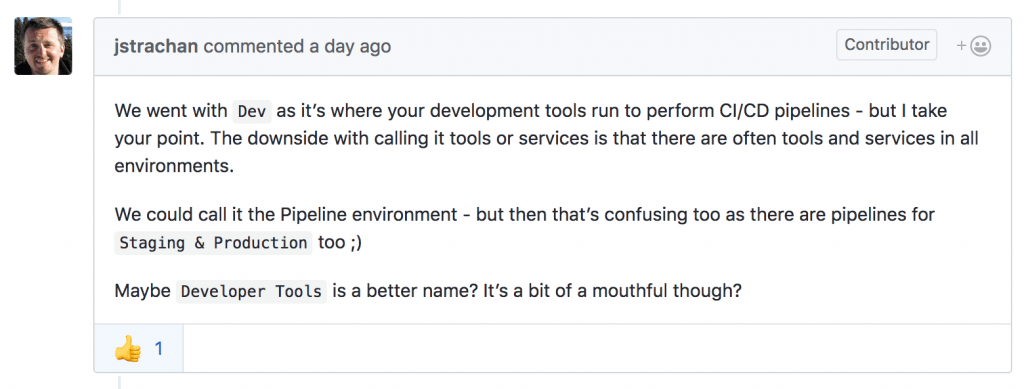
It could be a good idea to be a "dev" environment to "developer tools" in order to avoid confusion, but such a decision should be made by community :)
Bear in mind that when Kubernetes is running on a local minikube cluster, Jenkins is unable to receive webhooks calls from a remote repository (such as GitHub) since the local address will not be reachable from outside the network unless configuring some port forwarding. A simple solution is to expose local address via services such as NGROK or LocalTunnel. 
To check all Services running on Kubernetes cluster run:
kubectl get svc
Result would look like:
| name | Type | Cluster-IP | External-IP | Port (s) | Age |
| heapster | CLUSTERIP | 10.98.140.95 | <None> | 8082 / TCP | 5d |
| jenkins | CLUSTERIP | 10109220237 | <None> | 8080 / TCP | 5d |
| Jenkins agent | CLUSTERIP | 10.96.101.173 | <None> | 50000 / TCP | 5d |
| Jenkins-x-chartmuseum | CLUSTERIP | 10.109.214.28 | <None> | 8080 / TCP | 5d |
| Jenkins-x-docker-registry | CLUSTERIP | 10.106.57.184 | <None> | 5000 / TCP | 5d |
| Jenkins-x-mongodb | CLUSTERIP | 10102247177 | <None> | 27017 / TCP | 5d |
| Jenkins-x-monocular-api | CLUSTERIP | 10106221194 | <None> | 80 / TCP | 5d |
| Jenkins-x-monocular-prerender | CLUSTERIP | 10.97.208.46 | <None> | 80 / TCP | 5d |
| Jenkins-x-monocular-ui | CLUSTERIP | 10.104.74.160 | <None> | 80 / TCP | 5d |
| nexus | CLUSTERIP | 10108159155 | <None> | 80 / TCP | 5d |
Figure 1. Kubernetes services
Some of the services are exposed to outside networks via Ingress out of the box. To check detailed Service configuration run:
kubectl describe svc <SERVICE_NAME> .
Here is sample output for 'nexus' service:

Figure 2. Nexus pod Service configuration (exposed)
In particular cases, ‘nexus’ service exposes a public URL which can be accessible from outside of the cluster. When the service is not exposed, it can be accessed only within the cluster itself (example of ‘jenkins-x-mongodb’):

Figure 3. MongoDB Service configuration (not exposed)
Congratulations! You successfully installed JX on your local Minikube cluster! Stay tuned, next step will be to create and promote our first application with a help of Jenkins X. Meanwhile, here is your trophy:

One of the best options to get started with Jenkins X is to create a project from a provided template. JX provides a selection of quickstart projects for Node JS, Rust and GoLang amongst others.
jx create quickstart will launch installation process which will ask for language selection, set up a git repository and push the project, which in addition to standard code source will contain Docker, Jenkins file and compilation Makefile. All quickstart projects are cloned from https://github.com/jenkins-x-quickstarts repository, provided by Jenkins. JX project advertises the opportunity to create custom quickstart projects and which can be submitted via pull request to be included in samples.
Once quickstart project is created, it is registered within Chartmuseum via Monocular:
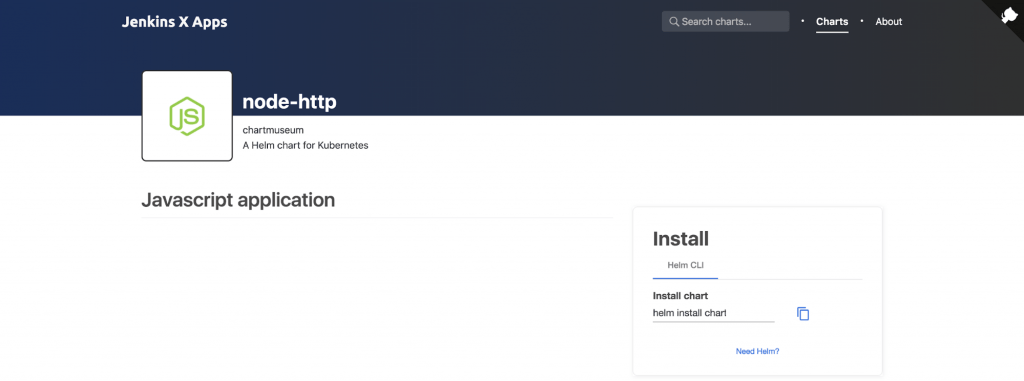
Figure 4. Monocular with quickstart NodeJS application
To ensure our application image is pushed to Docker registry, we can send a request
curl http://docker-registry.jx.192.168.64.4.nip.io/v2/_catalog?n=1
which gives a first list of Docker images:
{
"repositories": [
"jenkinsx/node-http"
]
}
Figure 5. Response from Docker registry
By default, the created application doesn’t belong to any of environments (Even though expected to reside within development context). By definition, the development environment only contains services which were created by Jenkins X. To make application visible within staging or production environment, it should be promoted.
Let’s assume we have our newly-created Node JS application ready. And now we want to add some feature (display particular text on the main index.html page). Firstly, we create a branch from master called feature-6, and modify a single file with our new change.
For a better feeling of how build and testing is performed by JX, we will also include a failing on purpose test on this branch.
Once we finished, changes are committed and the branch is pushed to the remote Git server (GitHub in our scenario). Since our local Jenkins server is web-hooked to remote GitHub, branch pipeline is automatically triggered locally. But wait! Since our branch name doesn’t satisfy PR-* convention, it is only pushed on the server without being built or tested:
As result of the particular configuration, Jenkins shows success on latest push on feature-6 branch (even though one test has been set on purpose to fail):

Next step is to create Pull Request to merge our feature branch to master. It can be done from GitHub UI in repository dashboard:

Once pull request is created, JenkinsX automatically creates PR-* branch, and builds/runs all tests before the merge. Since our test was purposefully failing, GitHub was unable to merge pull request created by JX:

And following description, Jenkins provides an overview of failure:

After the test has been fixed, JenkinsX refreshes PR-* branch with a new version of feature branch and runs build/test process to ensure PR can be merged:
In addition, to test and build check, JX also creates a preview environment which can be accessed from GitHub pull request comments section:

Yes! We can check our application straight on preview environment before merge request is approved! But what happens after accepting merge request?
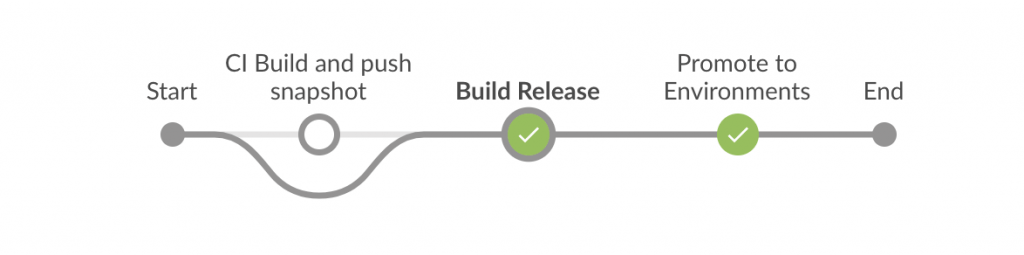
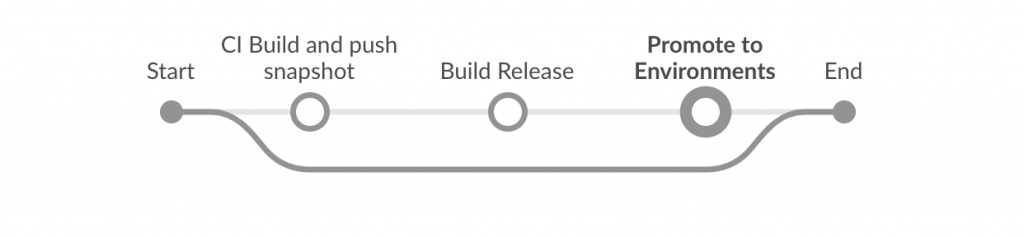
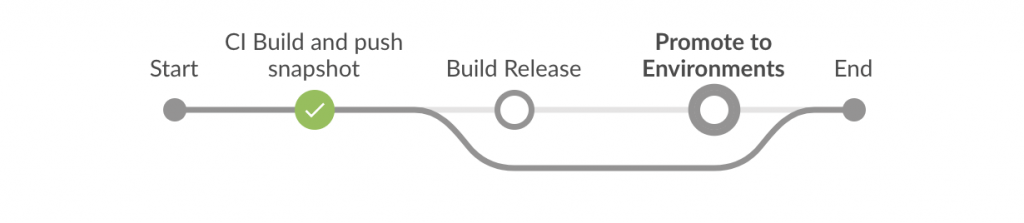
Well, that is where JX shows its most powerful features with automatic versioning, artefact management and environment management. There are two main stages in approved PR pipeline:
- Build Release stage: Jenkins runs tests, creates Docker image and pushes it to local Docker registry.
- Promote to Environments stage: Jenkins creates release information in repository including archived source code and pull request history. It also creates a Chart and pushes it to Chartmuseum, which will be accessible after from Monocular to be pulled via Helm. It is worth to mention, that Chartmuseum will contain all versions of Charts pushed to it.
In addition to described stages, Jenkins also includes versioning information to requirement.yaml in staging environment repository and makes application to be accessible from stage environment URL:

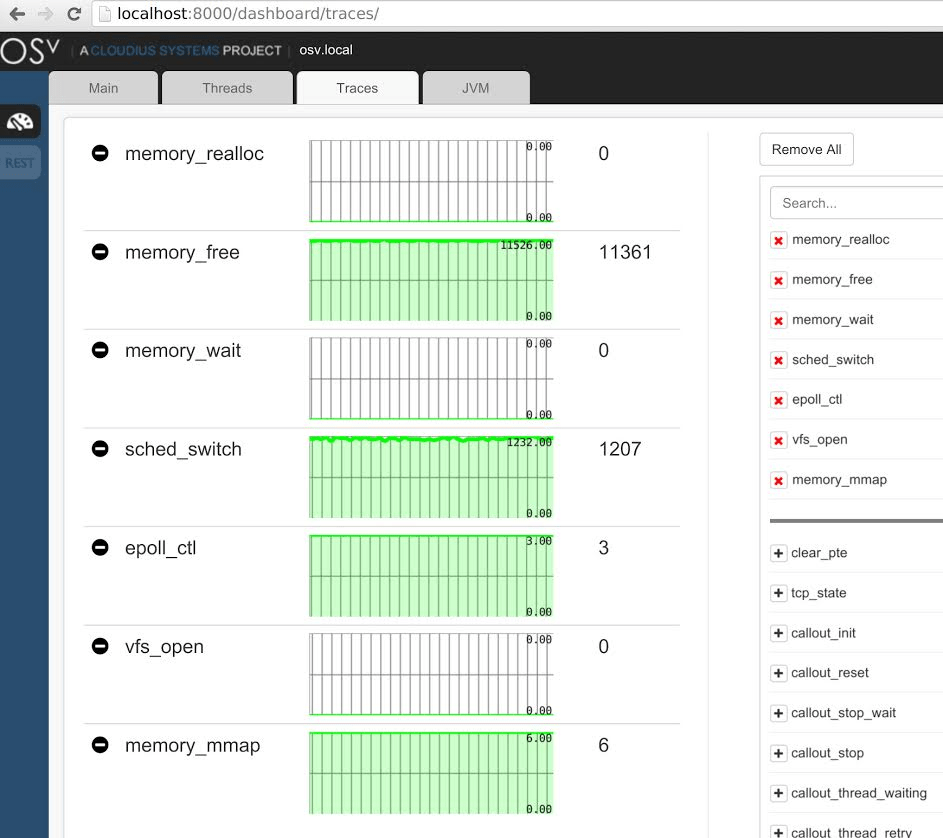
But what about resources?
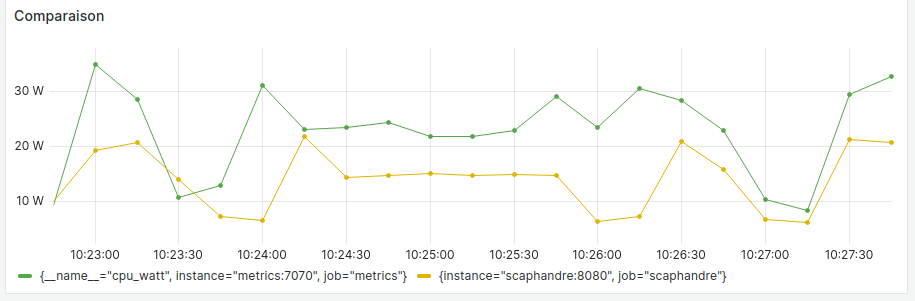
Resource-wise, Jenkins requires decently-powerful hardware to be run on. Considering default RAM for VM is 4Gb and minimum 3 CPU, it is impossible to create JX cluster on a free AWS EC2 Micro instance (for example). As a load comparison, here is a snapshot of Kubernetes allocated resources dashboard before any worker execution:
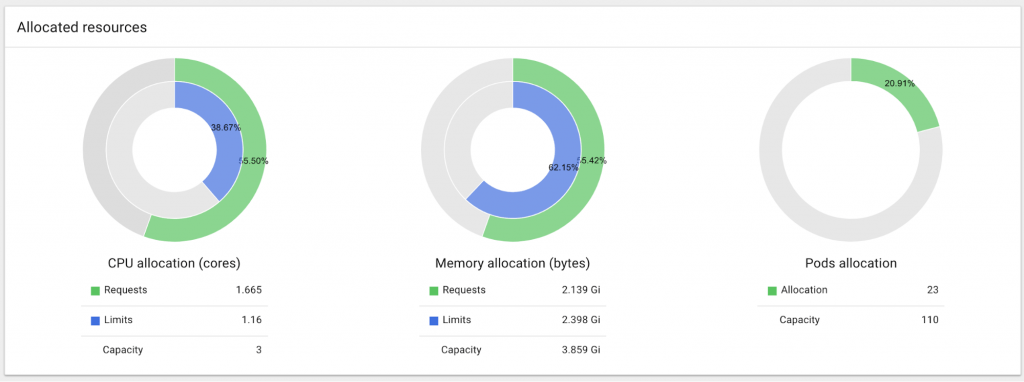
Figure 6. Kubernetes allocated resources dashboard (idle)
From provided snapshot it is clear that all CPU and RAM limits are within allocated capacity. In order to understand resource allocation load during building process, we submit a pull request which invokes Node JS worker. As a result, we are getting dramatic changes in our dashboard:
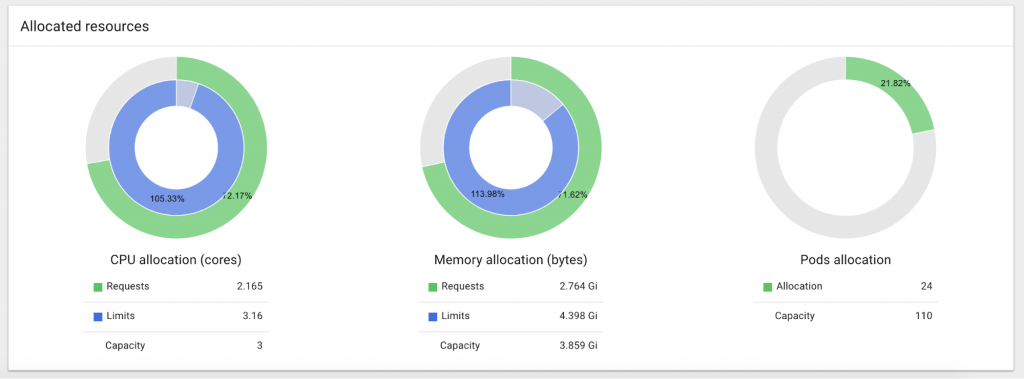
Figure 7. Kubernetes allocated resources dashboard (during build process)
Both CPU and Memory allocation resources limits have been increased (by 5.33% in CPU and 13.98% in RAM). Pods allocation remained on almost the same level with unnoticeable change in less than 1%. Considering only one quickstart application has been run through the pipeline, situation would change while processing couple of different applications simultaneously.
????????????Congratulations! application made it through entire pipeline! Freshly built, tested and deployed to repository - it is versioned, and chart can be pulled using helm. Here is your trophy! You deserved it.
Conclusion
**
- Automated promotion to environments
- Artefact management and deployment
- Live preview environment of application
- Great set of out-of-the-box tools
- Complimentary automated commit messages on build results
Having a tool that is capable to take care of CI/CD processes in Kubernetes environment is a big deal, considering scarcity of open source competitors. From personal experience, developers are dedicating a lot of time to improve Jenkins X and reply on any issue almost instantly. Growing popularity of Kubernetes-based applications requires a reliable CI/CD solution, and Jenkins X does it very well.
There is no doubt this solution will become an official part of Jenkins family and take a major role in establishing Kubernetes pipeline management, which allows Jenkins to compete against other solutions that propose working pipeline out-of-the-box. JX is also a perfect product for those companies which value on-premise aspect, which means having a full control over pipeline without depending on vendor or subscription.
Authors downunder:
Ilya Trofimov and Nick Shulhin ❤