How does it work? Kubernetes: Episode 4 - How to Ansible your CoreOS, and etc(d)!
Hey everybody,
TL;DR
I hacked something together in order to create a Kubernetes cluster on CoreOS (or Container Linux) using Vagrant and Ansible.
If you keep reading, I'm going to talk to you about Kubernetes, etcd, CoreOS, flannel, Calico, Infrastructure as Code and Ansible testing strategies. It's gonna be super fun.
The whole subject was way too long for a single article. Therefore, I’ve divided it into 5 parts. This is episode 4, regarding the usage of Ansible on CoreOS, and etcd.
If you want to try it:
git clone https://github.com/sebiwi/kubernetes-coreos
cd kubernetes-coreos
make up
This will spin up 4 VMs: an etcd node, a Kubernetes Master node, and two Kubernetes Worker nodes. You can modify the size of the cluster by hacking on the Vagrantfile and the Ansible inventory.
You will need Ansible 2.2, Vagrant, Virtualbox and kubectl. You will also need molecule and docker-py, if you want to run the tests.
Can I see the code now?
Right, code. The first step is to actually create the CoreOS virtual machines. I used a really simple Vagrantfile in which I specify how many instances I want, and how much computing resources each one of them is going to have:
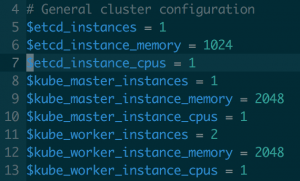
Amazing complexity
You can modify the amount of instances you want to create in this part. Be aware that if you add hosts, you will also need to add them in the inventory for the Ansible code to target all the machines.
I also created a simple IP addressing plan. The principle is that each machine subtype is going to have less than 10 nodes. So I just number them from 10.0.0.1x1 to 10.0.0.1x9, with x being 0 for the etcd nodes, 1 for the Kubernetes master nodes, and 2 for the Kubernetes worker nodes:
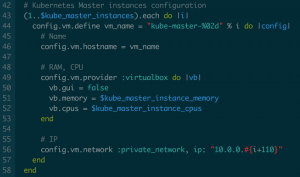
Absolute power
By the way, you can configure your virtual machines by specifying an Ansible playbook, using the Ansible provisioner in your Vagrantfile like this. I choose not to do so because I like having my `vagrant up` actions separate from my actual configuration. Extra coupling does not abide by this philosophy.
Now you're only a `vagrant up` away from having your CoreOS virtual machines running on your computer. After that, you can export the SSH configuration used by Vagrant with `vagrant ssh-config > ssh.config`. You can then use this configuration for the Ansible configuration, if you include it in your ansible.cfg file:

Like this
I really like Makefiles. I use them quite often when I have write more than one long command, or many different ones that are going to take a while. I'm also kinda lazy. So I just did this:

make: automating your life since 1977
This way, `vagrant up && vagrant ssh-config > ssh.config` becomes `make vagrant`, which saves me 3,7 seconds every day.
You can check the Vagrantfile, the ansigle.cfg and the Makefile on the GitHub repo.
Let's set up our testing configuration now.
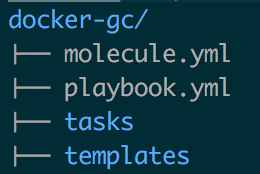
Molecule uses a yaml configuration file called molecule.yml. You can use it to define the configuration of your test infrastructure, and to specify the playbook that you want to test. Usually, I try to test each role independently. That means that I'll have a molecule.yml file per role directory, and also a playbook.yml file that uses the role that I'm testing.
Like this
The molecule.yml file specifies an infrastructure (I usually use a single Docker container), and it also specifies which playbook needs to be used on the previously defined infrastructure. For the example in the image above, the playbook.yml file would just include the docker-gc role. Molecule also does this for you automatically if you type `molecule init --driver docker` inside of your role directory. Dope.
This is a pretty good testing strategy when you have roles that are independent from each other. It works like a charm when I test my docker-gc role. The thing is that for this project, the different components depend on each other. I cannot test that my kube-master role is working if I don't have an etcd cluster running. I cannot test that my kube-worker role is working if I don't have at least one Kubernetes master node. Tricky.
So instead of creating a molecule.yml file for each role, we're going to create one at the root of the project, that is going to test our master playbook. Inside of it, we're going to specify a sample test architecture, which is going to be the same one we defined in our Vagrantfile. We're also going to specify the playbook that we want to test. We're going to name it kubernetes.yml (creative right?). You can see the molecule.yml file here.
You can test the roles using the `molecule test` command. This will:
- Create up the infrastructure (create)
- Verify the syntax of the Ansible roles (syntax)
- Execute the playbook (converge)
- Check that the playbook is idempotent by checking for the diffs that a new execution would apply with a dry run (idempotence)
- Destroy the previously created infrastructure (destroy)
These actions can be ran separately by typing `molecule <action>`, and replacing action with one of the expressions between parentheses above. For example, `molecule converge` will just play your playbook on the hosts. You get the idea, right?
I added the `molecule test` command to my Makefile, under the `test` target. That means that I can run `make test` instead of `molecule test`. That makes me gain 0.4 seconds per day. We're up to 4.1 seconds in total. Sweet!
Now that we got our virtual machines running, and our testing configuration ready, let's start configuring stuff. We just gotta take care of a little problem before we can go YOLO with Ansible though.
CoreOS and Ansible
Remember back then when I said that CoreOS ships only with the basics? That means no Python. By extension, that means no Ansible. That's why this time it's a little bit more tricky.
So we need to do something about that. If CoreOS won't come to Python, Python must go to CoreOS.
Since we cannot use Ansible to install Python because we need Python to execute Ansible modules in the first place, we'll just install Python manually in each one of the machines, right?
Well, no, not really.
By the way, if the previous question made you think about the chicken or the egg causality dilemma, just know that the egg came first.
There are three Ansible modules that do not need Python installed on the target host: the raw module, the script module, and the synchronize module. The first allows you to execute an SSH command, without going through the module subsystem. The second one allows you to copy a script to a remote host, and execute it using the remote host's shell environment. The third is a wrapper around rsync, which just uses rsync on the control machine and the remote host.
Using these modules, we can install a lightweight Python implementation called PyPy. The workflow is as follows: I verify that Python is installed using the raw module, and if that is not the case, I install it using a more raw tasks.
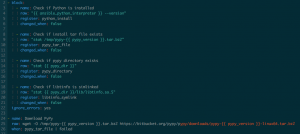
Right on
Why use the `changed_when: false` flag on the tasks inside the block, you say? The thing is that each time you execute a raw task, a change will be made, since the shell command is actually being executed on the target host. That means that each time you run your playbook, you will execute the tasks, no matter what. So if you're downloading things, creating directories, or adding lines to configuration files, you will do so multiple times. This is not idempotent. That's why I verify the state of the Python installation before installing Python, and only execute it when Python is not installed. I just add the `changed_when: false` flag to the verification tasks, since they only verify the existence of the Python associated resources; there are no system modifications because of them.
I feel this is slightly better than executing a shell script with every task embedded into it. It allows me to replay tasks when certain script do not exist, and to have a clear idea of what failed when I get an error: I know right away which task failed, which helps in the debugging process.

Thanks mom [1]
I did not create this approach, by the way. I just optimised it to make it actually idempotent. I guess you need to stand in the shoulders of giants in order to further from time to time, right?
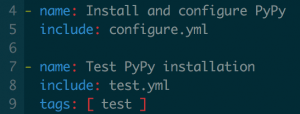
Let us revisit testing for a second. As a general rule when writing Ansible code, I try to tag roles and tasks as much as possible. This helps a lot if you want to execute only one part of your playbook, or only one role. I also try to use smoke tests whenever it is possible. This means that I'll check that the main feature of my role is working after executing it. If I'm installing Python, I'll just do something like `python --version` and check that I don't get any errors. For that, inside of each role's tasks directory I'll try to create a main.yml file, which will in turn include a configure.yml file and a test.yml file. The configure.yml file will do all the installation/configuration of the specified component, and the test.yml file (tagged with the test tag) that will test the component, if possible.
Smoke test all the way!
By doing this, you will actually test that your infrastructure is running and that it is probably properly configured. Then, if you want to run nothing but your tests, you can do it if you specify the `test` tag while running a playbook. Something like `ansible-playbook -i inventories/vagrant.ini kubernetes.yml --tags test`.
And thus, the 'smoketest' target on my Makefile is born.
Let us continue.
SSL
I won't go really deep into this part. OpenSSL exists since 1998, so it's not exactly recent news. I create a CA for the whole cluster, and then create keys and sign certificates for the API server, for each one of the workers, and for the administrator (the one that's going to be used by you when configuring kubectl).
etcd
In this deployment we're using a single etcd node. You can modify the number of instances from the Vagrantfile, the Ansible code is able to handle a multi-node cluster. Just use odd numbers, because of fault tolerance.
Anyways, configuration is pretty straightforward on the single-node scenario. I just configure it to listen on every interface, and then add the advertise client url to the etcd unit using environment variables:

Straightforward
And it gets slightly trickier with a multi-node configuration, since the nodes need to be aware of each other, using the ETCD_INITIAL_CLUSTER variable. You also need to provide a node name, and a cluster token for everything to work. There are other options, like using an existing etcd cluster as a discovery mechanism (but we don't have one at the moment), or a public etcd discovery system.

Less straightforward
All of these configurations can be made either with environment variables or with flags when starting the etcd2 service. The ansible_env.COREOS_PUBLIC_IPV4 variable will be replaced by the node's public IP. I do this often on this project. Then, I just start and enable the service. This is done with the systemd module, and that's why we need Ansible 2.2.
The test part of the role verifies that machine is listening on port 2379, that the etcd cluster is reachable via etcdctl, and then it verifies that the "coreos.com" default namespace exists. It's a simple, effective smoke test.
With our working 1-node etcd cluster (get it?), we'll configure the Kubernetes master node.
Excellent, how?
Aren’t you tired already? I know I am. That’s all for today. I’ll talk to you about the really really fun part in the next article. Stay tuned!