Keep your infrastructure keys safe with Vault
We have already presented Hashicorp Vault on this blog, how it is working in PKI mode (FR), its integration with AWS (FR) and with Kubernetes (FR).
This time we will focus on another Vault goodness: how to use Vault to manage your SSH accesses in your infrastructure.To do that, we are going to use in the article the SSH Secret Engine provided by Vault..
Version used : 1.0.0
Preamble: How do you do without Vault?
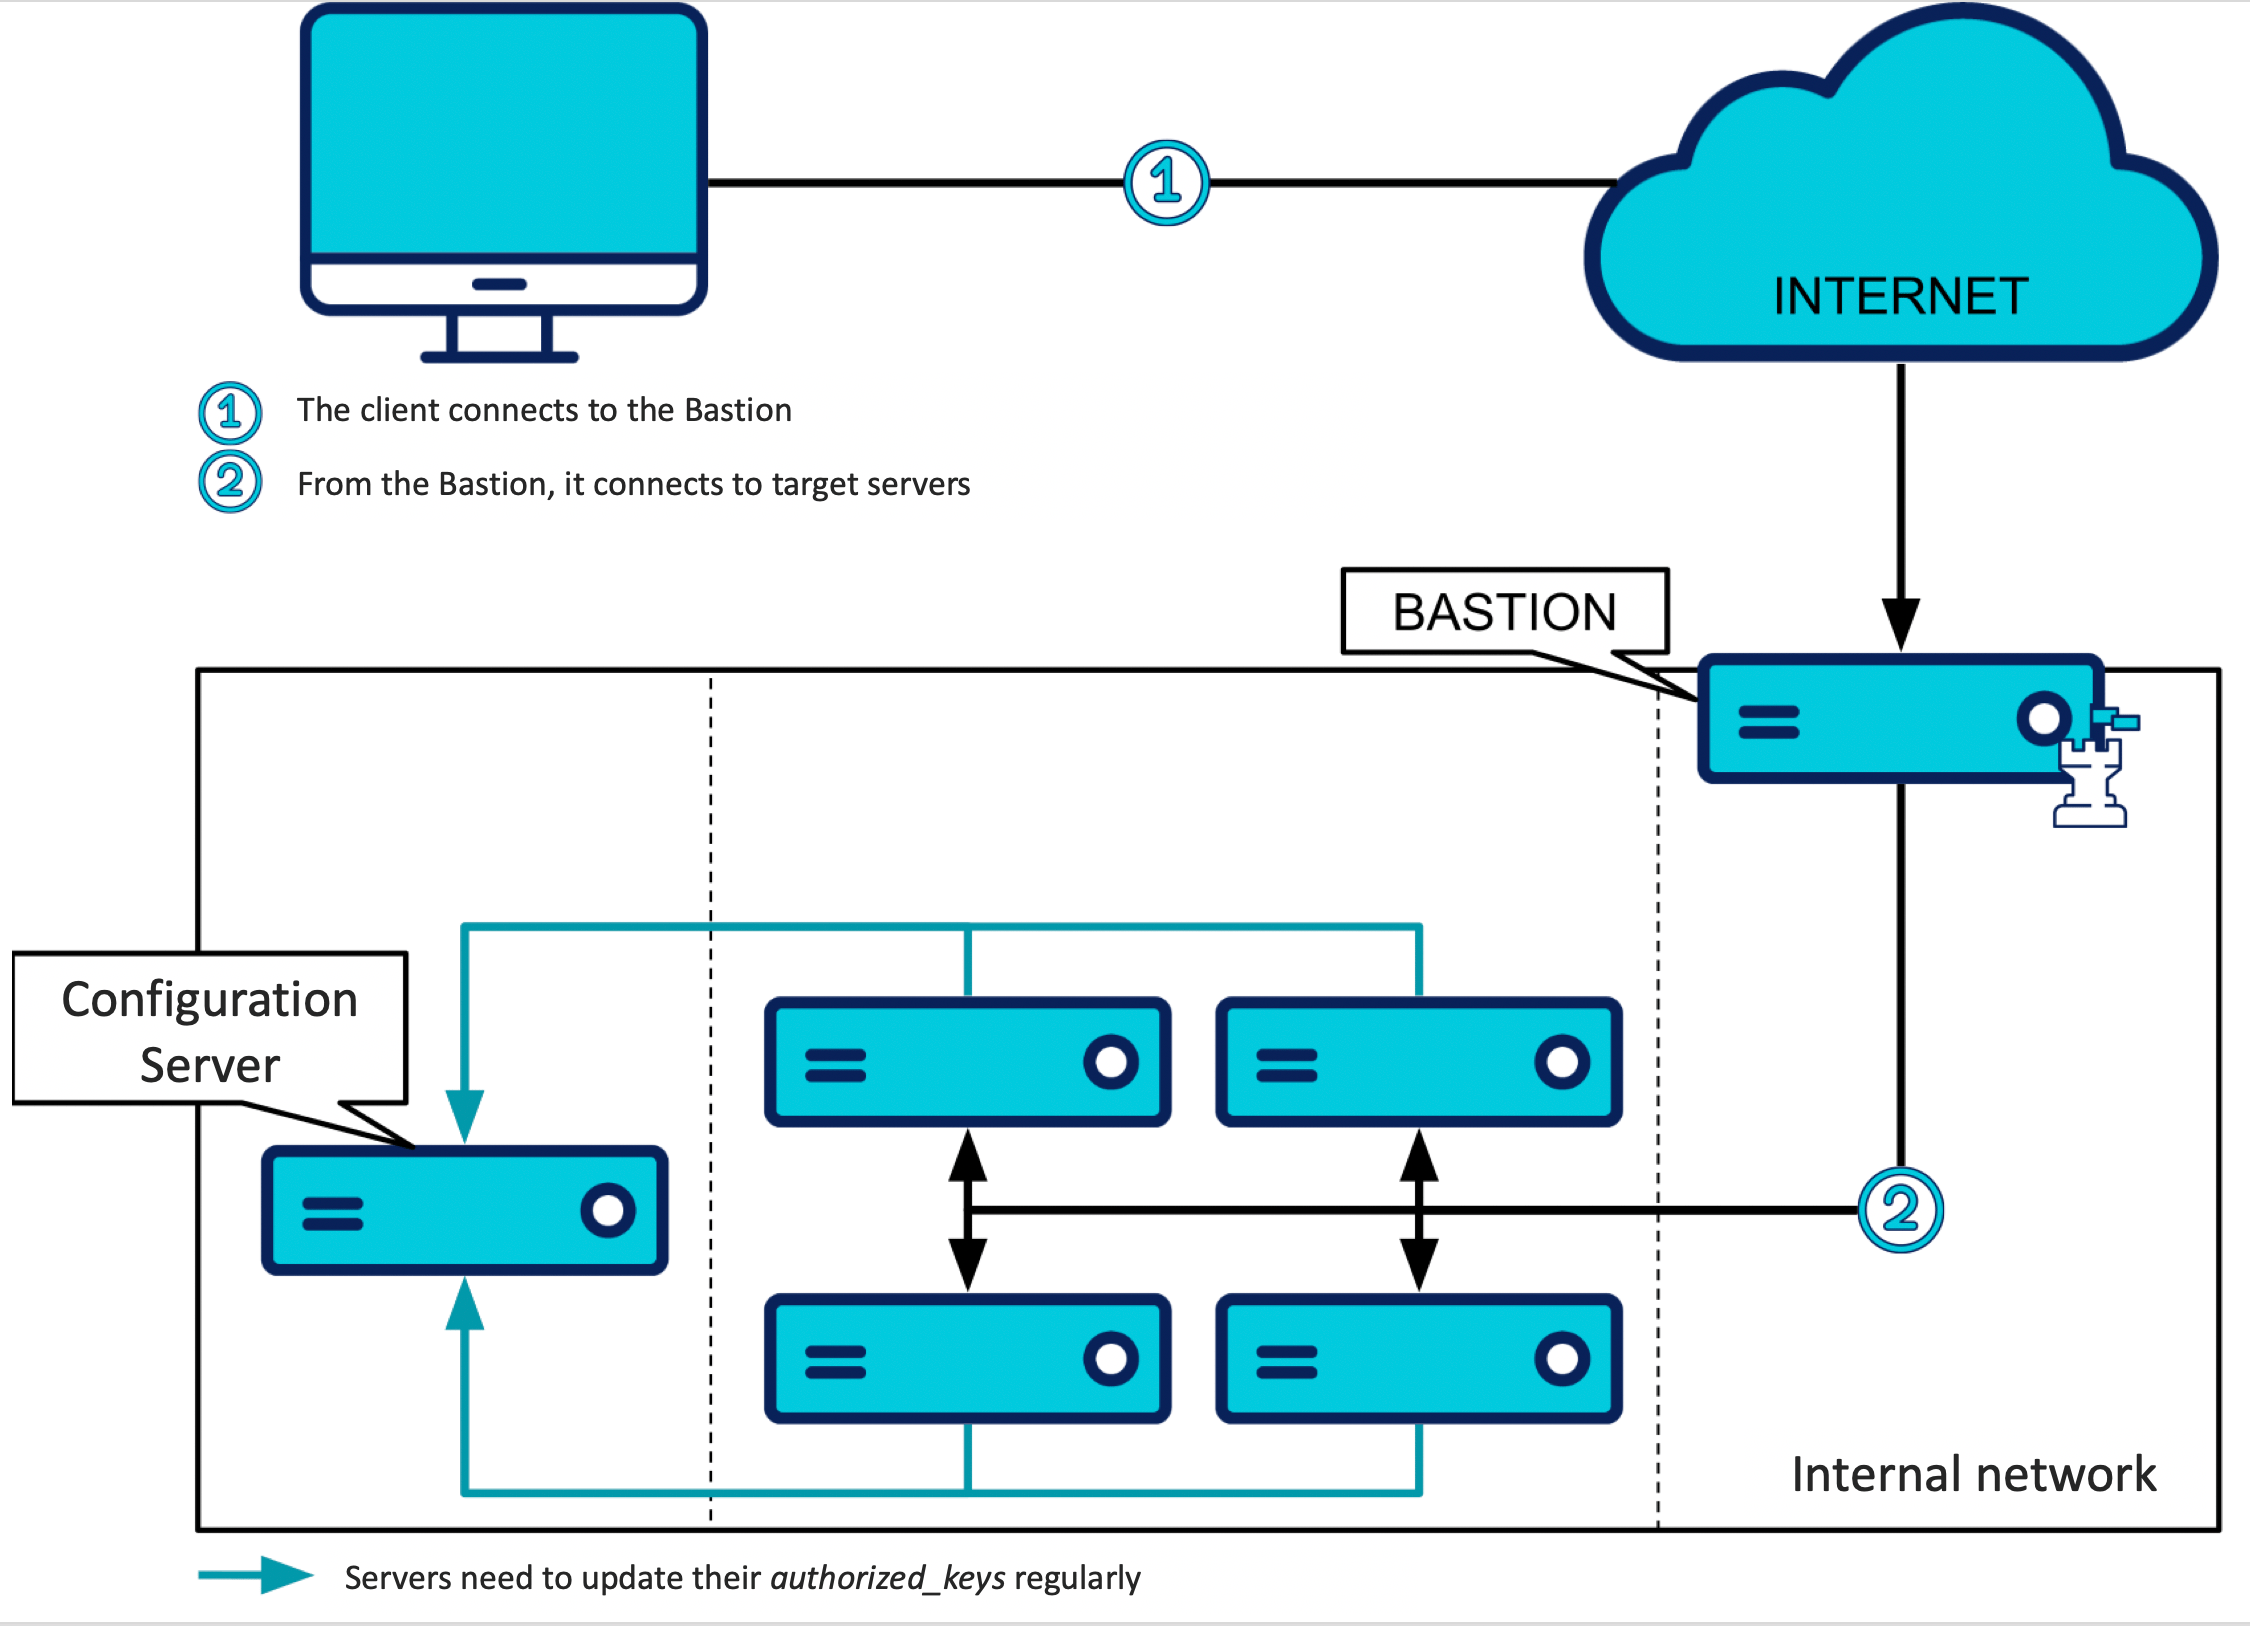
The problem of managing accesses to a Linux infrastructure is not new. The classic and cost-effective solution that could be used today would be composed of the following elements:
A user with SSH keys on his workstation that allow him to access the infrastructure
A controlled and secure entry point to the network, most often a SSH Bastion or a VPN
From this entry point, direct access to the servers
On those servers:
- An OpenSSH service, well configured, secure and audited
- rights per user key, managed through files authorized_keys
- An Infrastructure as Code tool like Ansible in pull mode or Puppet in charge of maintaining authorized_keys up to date
This would give us something like this:
This solution has several advantages:
it uses components that are already used in your infra, nothing new
bastion is an excellent pattern to access your infrastructure
the configuration management of your servers is very useful beyond the management of authorized keys
it does not require additional expertise, this is a consequence of the previous point
the use of authorized keys offers a relatively fine grained control over what the user can do once logged in
a well configured and auditable (by sending connection logs out of the machine) OpenSSH server, already provides a satisfactory level of security for many uses
Unfortunately, this kind of solution can become complex to maintain, especially when you have to manage accesses for a large number of people on a large number of servers:
grouping machines and make different roles for accesses can become necessary
this logic must then be implemented and maintained in the infrastructure code
Moreover, changes to the infrastructure code must be controlled with great finesse (to allow users to assign certain roles and not others, for example)
Some more elaborate solutions exist to address this complexity, such as the open-source solution Teleport from Gravitational which also provides an interesting feature for audit.
However, we can go further while continuing to use the standard features of OpenSSH and limiting the number of infrastructure components with the features offered by Vault!
Vault as the heart of your authentication
With a Vault based solution, the client will need to obtain access from the Vault server API before connecting to other servers of your infrastructure.
Now the solution looks like this:
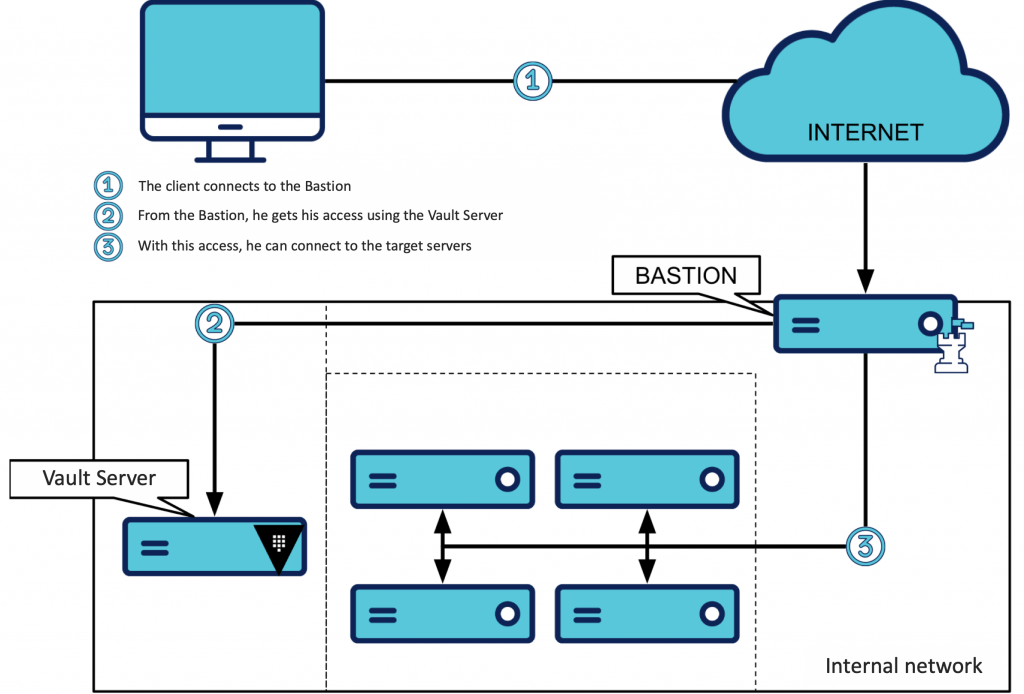
To obtain this access, the client will call the API of the Vault SSH Secret Engine. The SSH Secret Engine respects the "philosophy" of Vault:
it provides limited access, within a fine grained perimeter/li>
it provides time-limited access
Accesses provided to the user are "on-demand" and "temporary". So, how do I ensure that the accesses provided by Vault to the client are accepted by the servers?
Excellent question, and the answer is very simple: it depends!
There are actually two types of accesses that Vault can provide, each with its own server-side validation mode:
One Time Password (OTP) access type
(and a third and deprecated type that we won't describe here)
In the following examples, we will assume that we are communicating with a Vault server that has been previously unsealed with an access token which has enough rights to execute the action you want to do. It could be a admin token which has sufficiently broad modification rights on our Secret Engine. To test it by yourself, the root token should be good enough (but it's a very bad practice to use it in production!).
We will also consider that the SSH Secret Engine was activated on the path /ssh of the API (his path by default).
In addition to the links of the Vault documentation, you can find information about these concepts in the article “The PKI Vault on the grill (FR)”.
One of the objectives of using Vault in this article is to eliminate the need to update configuration changes in the repository of users and their access to the infra. For that, we will consider that the accounts are non-nominative on the servers (for example admin, web, read-only, ...).
This is a technical choice that is significant because what is gained in terms of server configuration ease is likely to be lost in terms of traceability of infrastructure usage. Indeed, it becomes more difficult and costly in terms of tools to identify who is at the origin of each action carried out with a non-nominative technical account.
A solution to continue to use nominative accounts would be to use a LDAP directory as a user repository. Linux servers have a native integration that allows them to use an LDAP directory as a user account database.
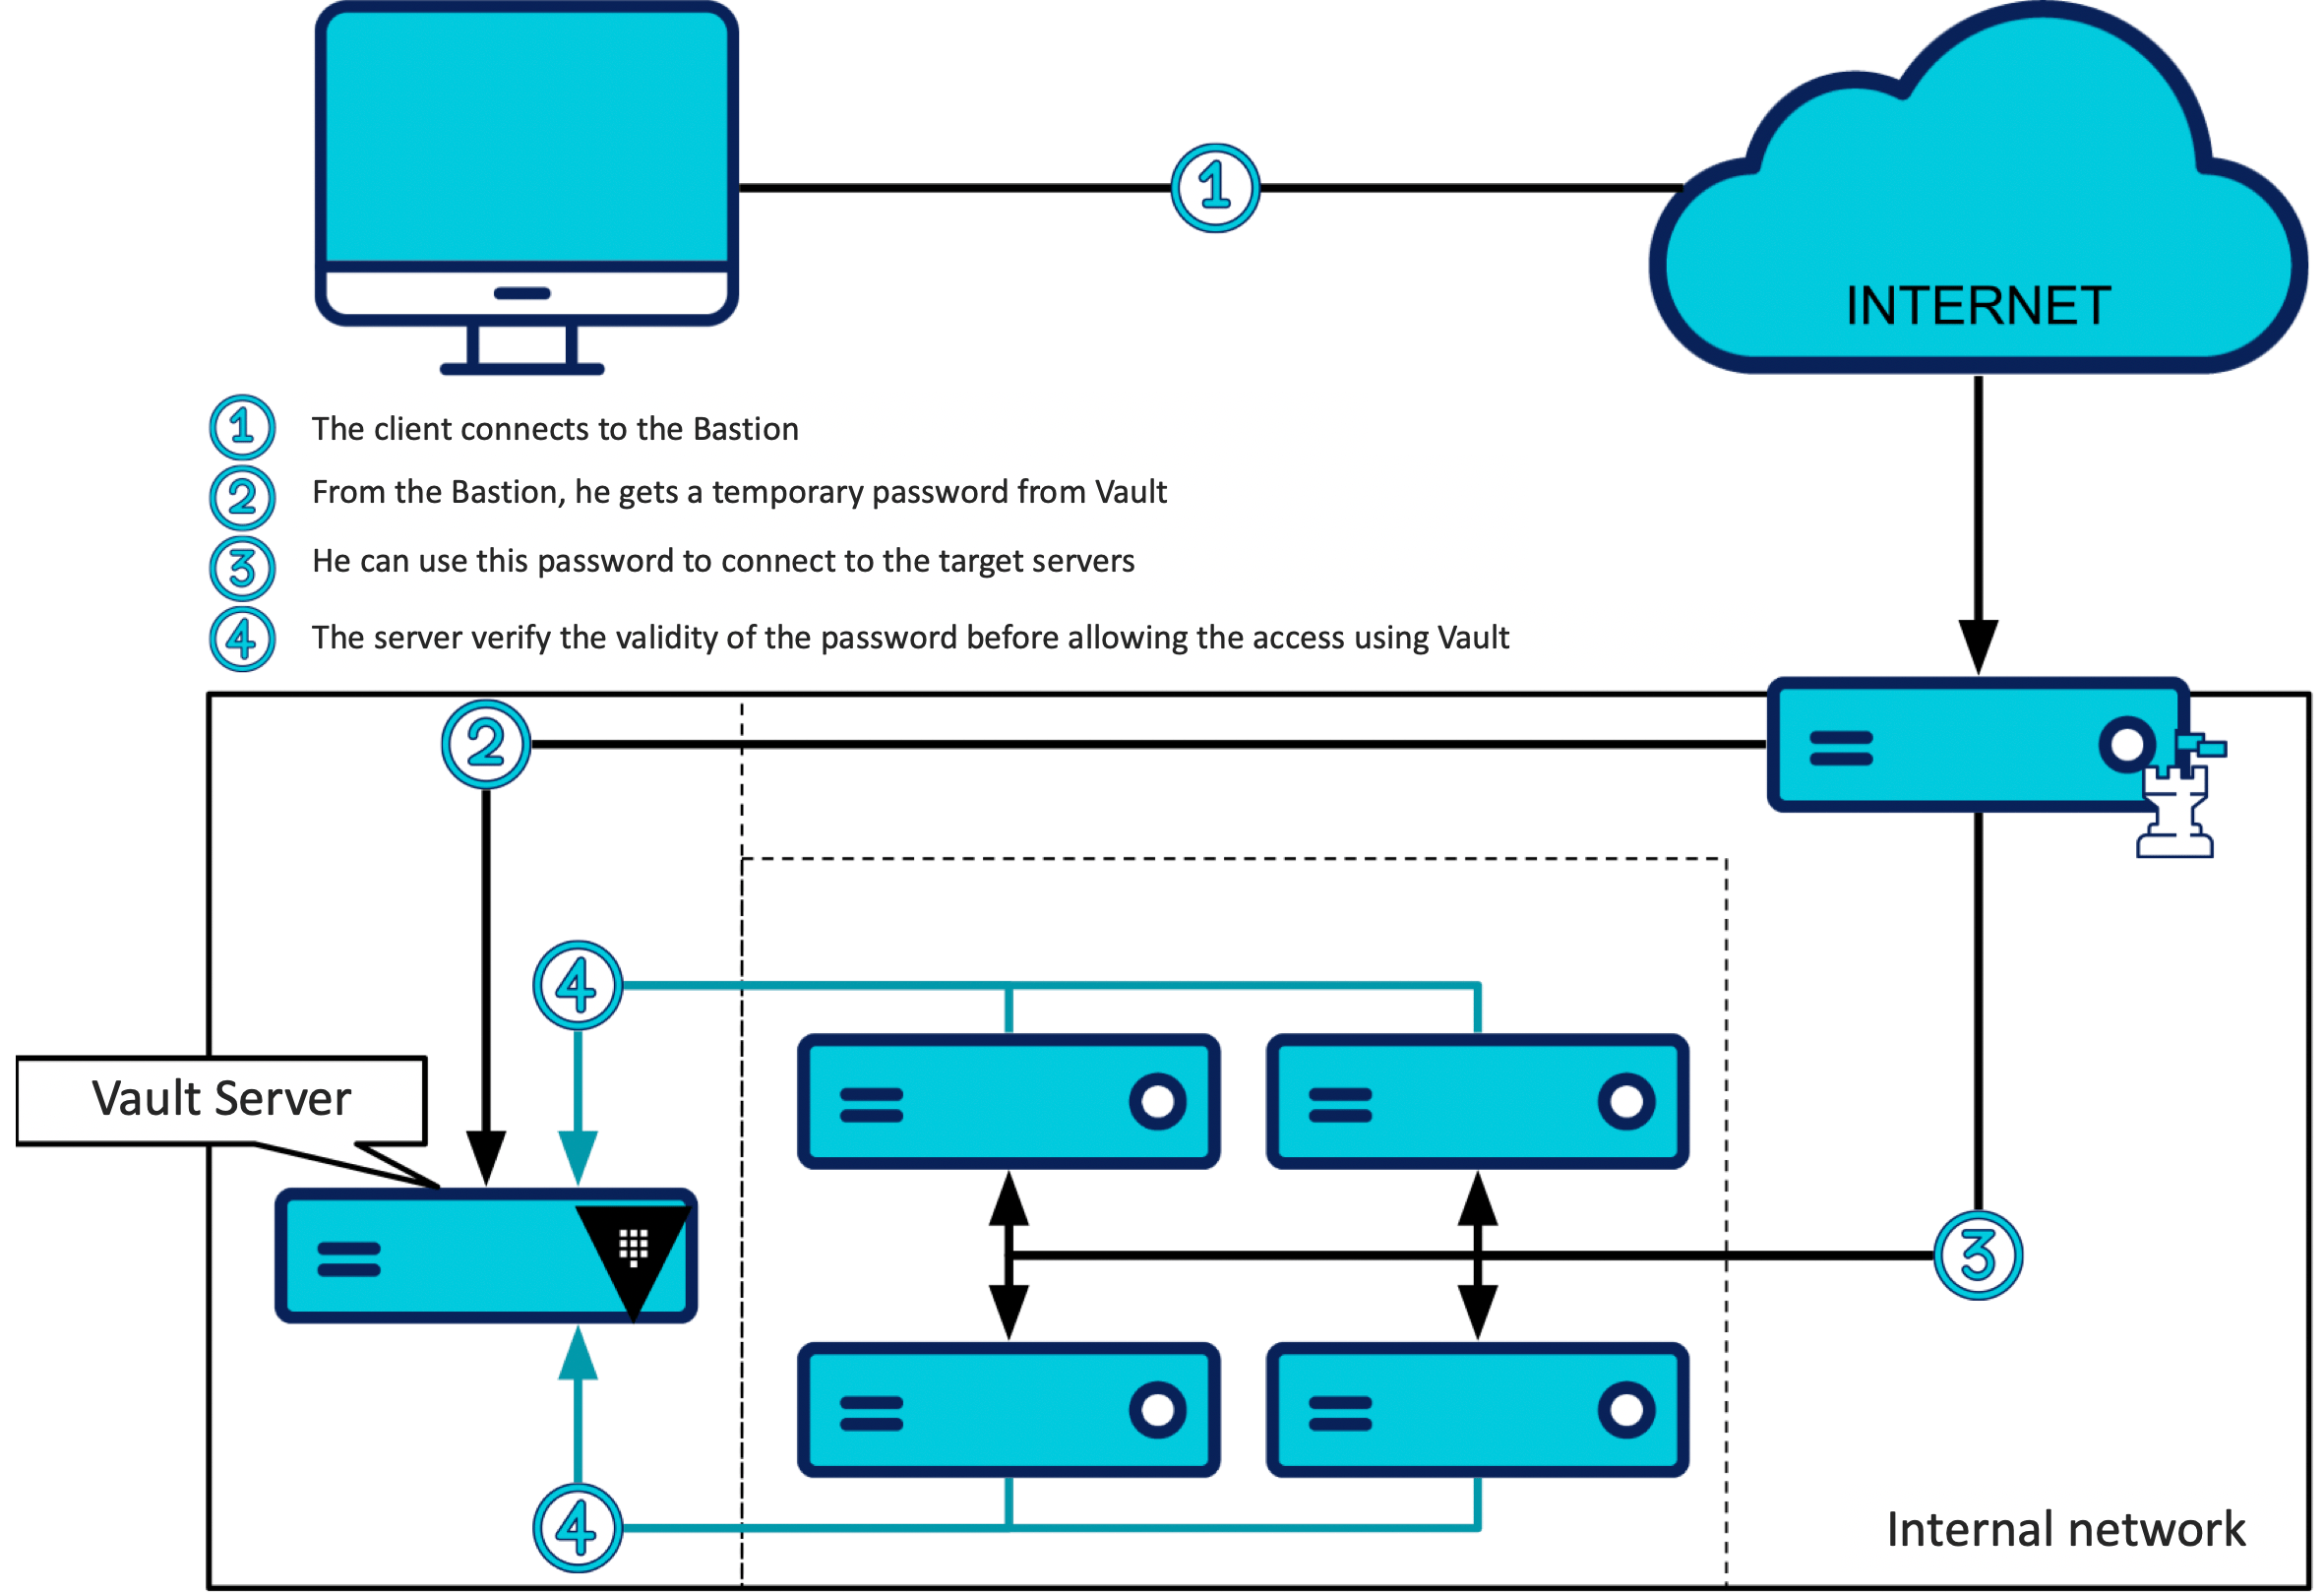
First solution: One Time Password access type
In this mode, Vault generates one-time passwords with which users can connect to the target servers they requested the access. When attempting to connect to the server, the server will query Vault to verify the validity of this password.
Configuring an access in OTP mode
Once the SSH Secret Engine is activated, it is quite simple to set up access in OTP mode.
We're going to create what's called a role in the Secret Engine, this role define a set of access rights that a person can/may request.
An OTP role can be created like this:
$ vault write ssh/roles/otp_web - <<'EOH'
{
   "key_type": "otp",
   "default_user": "web",
   "allowed_users": "web",
   "cidr_list": "10.1.42.0/24"
}
EOH
We just created an “otp_web” role which will allow to get a one time password from whom can use it ("key_type": "otp"), to connect to any servers of the subnet “10.1.42.0/24” ("cidr_list": "10.1.42.0/24") and only by using the “web” user ("default_user": "web" and "allowed_users": "web").
Once this role is created, the user will be able to request a password for the server, for example 10.1.42.123 (which is therefore part of the subnet 10.1.42.0/24) with the following API call:
$ vault write ssh/creds/otp_web ip='10.1.42.123'
In the SSH Secret Enginerole of the OTP type on the path “ssh/roles/[name of the role]” will make the path available “ssh/creds/[name of the role]” on which the user will be able to obtain single-use login passwords (within the limit of what the role configuration is allowing).
Checking the password on the server
Now that Vault is able to generate single-use passwords, all that remains is for the servers to be able to check the validity of the passwords presented to them.
To do this, you can use the small utility vault-ssh-helper.
The tool is a self-supporting Go binary that can be downloaded here. This binary will be called through the authentication mechanism PAM to check the passwords of users who are trying to log in. Once called, he will check the password with Vault, which will confirm if it is valid or not. If the same password is subsequently submitted to Vault for verification, Vault will refuse it, thus ensuring that each password is used only once.
The README.md file of the GitHub project gives all the necessary information to set up the tool, it describes the configuration (very simple) of the tool, how to configure PAM to call vault-ssh-helper when checking passwords for incoming SSH connections and how to configure the SSH server to ensure that they use PAM to verify the passwords they receive for their incoming connections.
First impressions
This option is interesting in many ways:
It allows to control very precisely the users and servers on which a connection is possible (using allowed_users and cidr_list parameters)
It ensures that the access provided by Vault are used only once
It offers very good auditability of server access, as each verification request made by a server will be logged in the Vault audit system
However, it has a major drawback that is even mentioned in the documentation: it requires a call to Vault for each password check. This presents a risk of spoofing the Vault server that could allow unauthorized access to the servers. In addition to this significant disadvantage, we can mention some other minor ones:
the need to use a third-party tool to insert into the PAM authentication process adds complexity to the basic software foundation that all servers in the infrastructure must have
the use of passwords rather than SSH keys to connect makes this system a little more difficult to support with some automated SSH accesses
the inability to control with Vault what the user can do once logged in (e.g., allowing port forwarding)
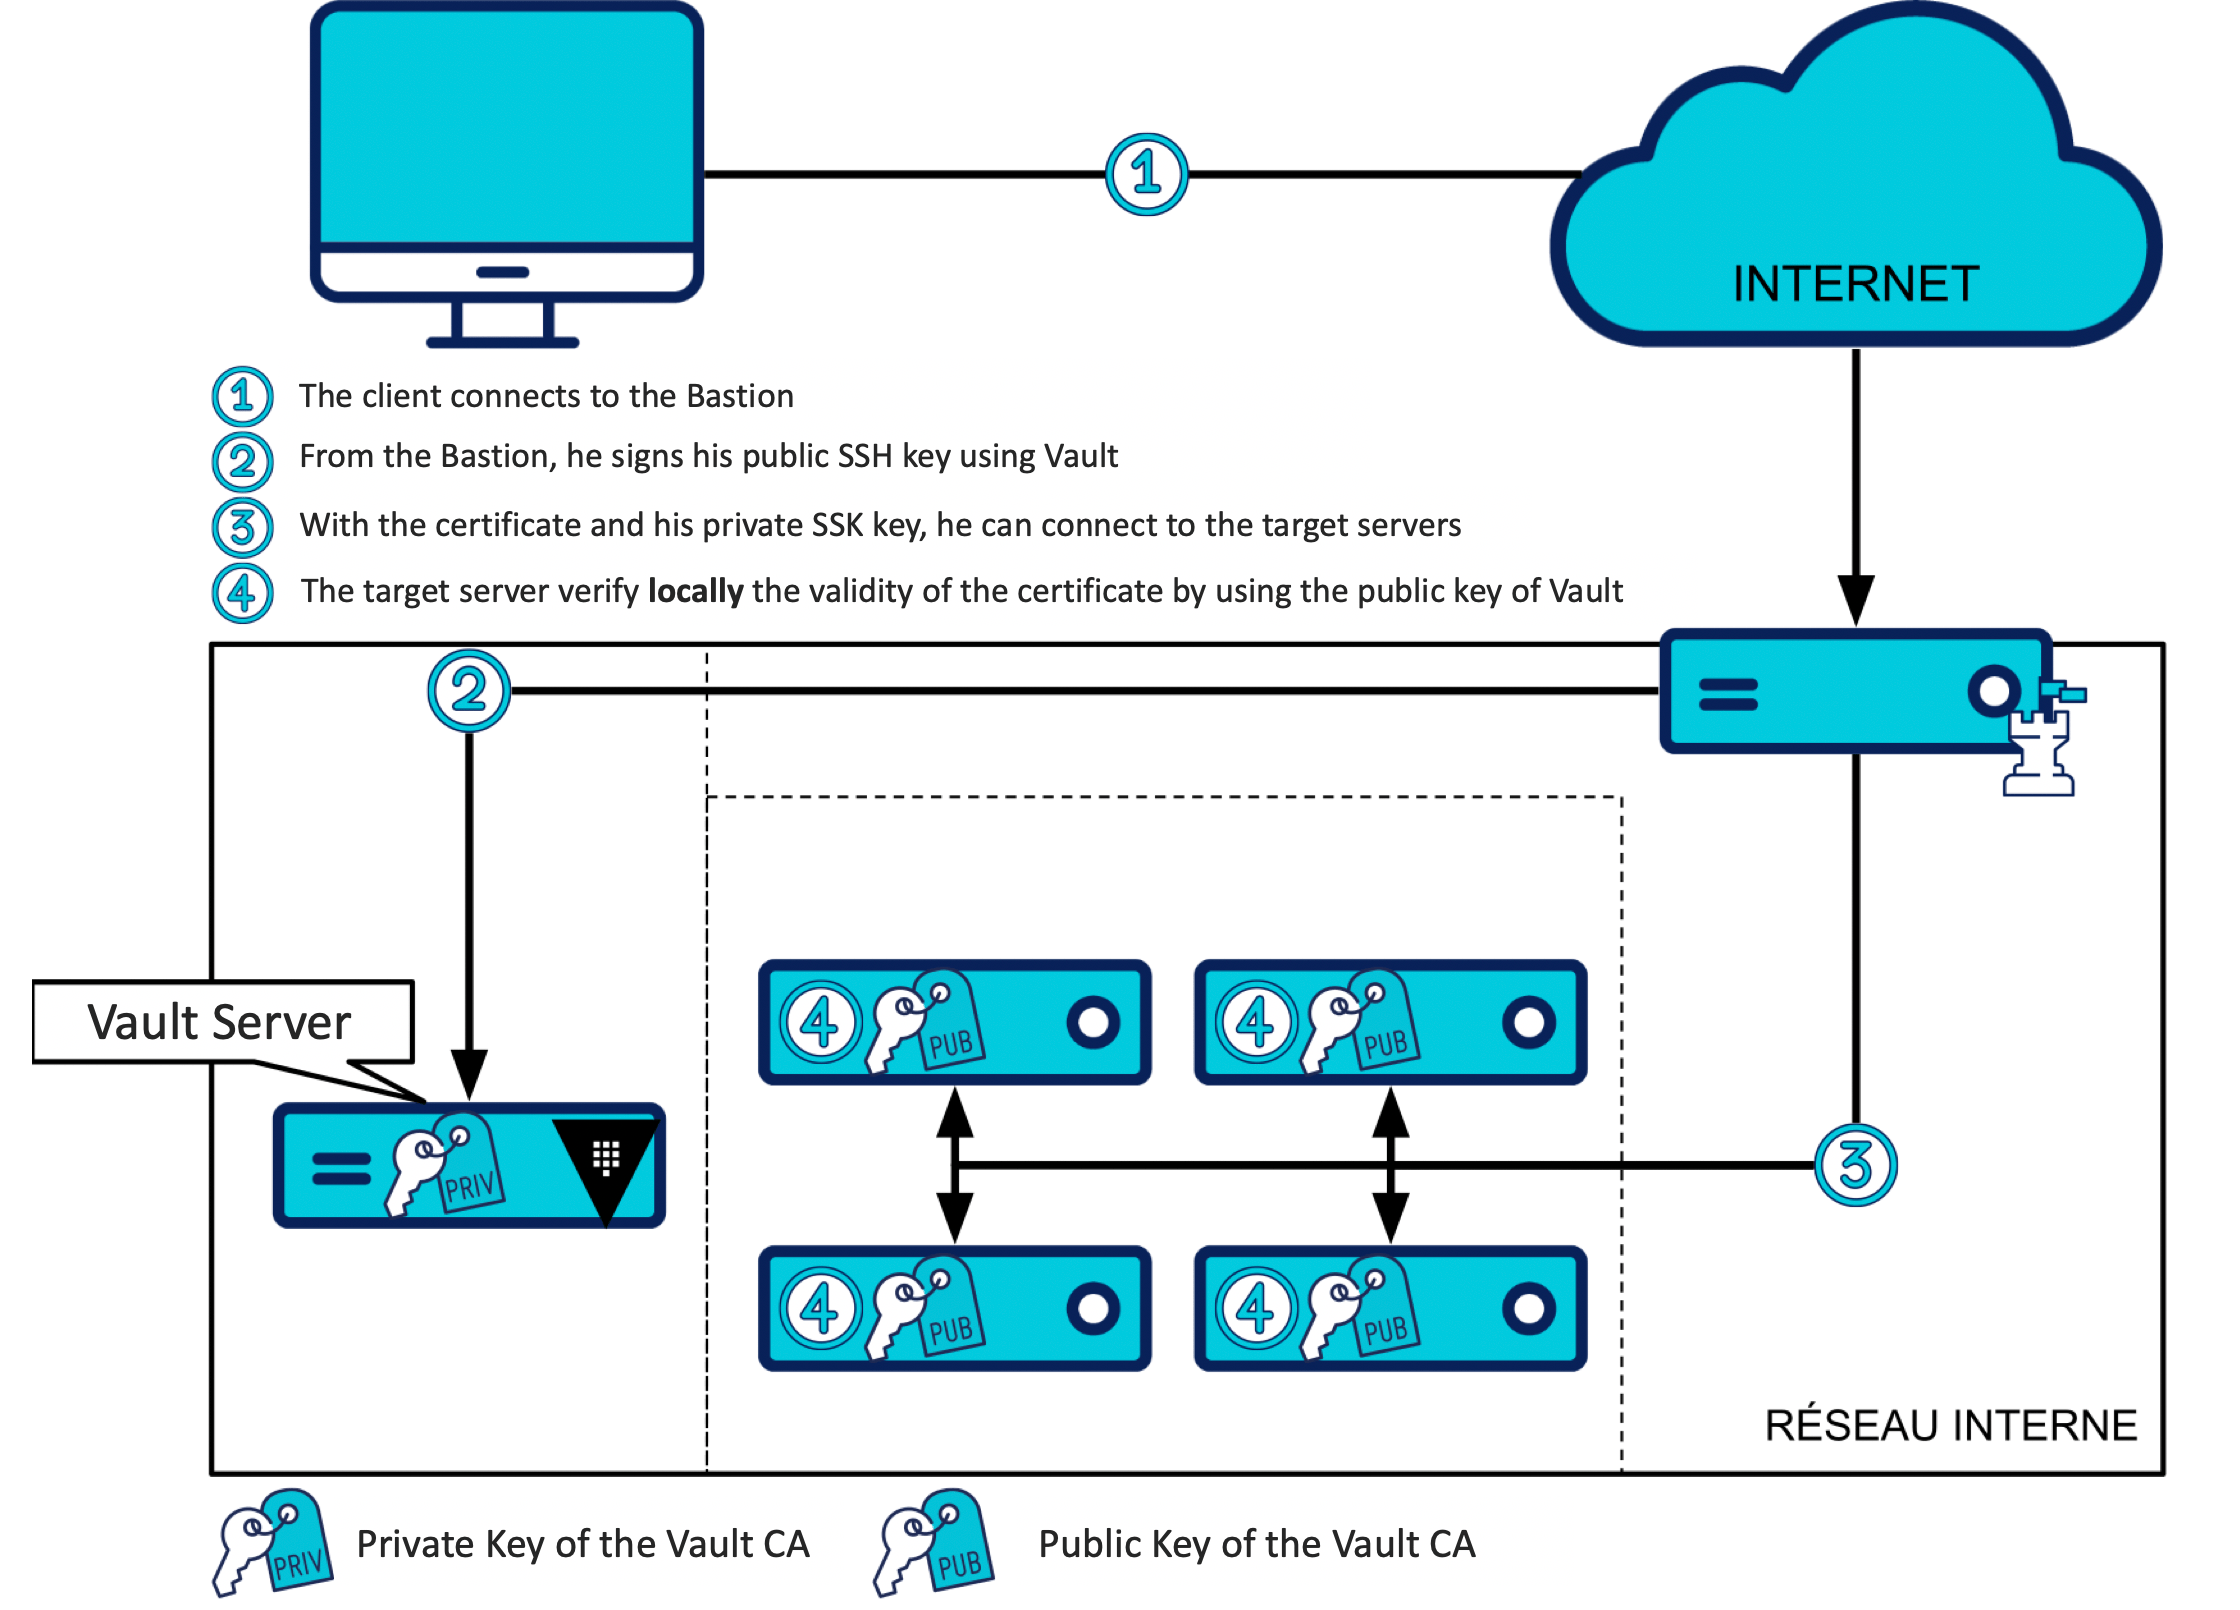
Second solution: SSH certificates access type
In this mode, Vault will sign the user's SSH public key with his private key, this signature will have a short validity period of a few tens of minutes maximum. When this user presents his signed key to the SSH server, the SSH server will verify that the signature matches the Vault public key that has previously been installed and indicated as a trusted CA (Certificate Authority).
You meant “TLS certificate”, right?
Well, no, it's a SSH certificate. Indeed, the asymmetric SSH key system is based on the same cryptographic primitive as TLS: the RSA encryption. Other systems start to become more popular (whether on the SSH or TLS side) but RSA remains the reference. It is also the only encryption supported by SSH Secret Engine. Note that the notion of TLS certificates is a small misuse of language, they are X.509 certificates which are used in the context of the TLS protocol. The use of these certificates is also essentially the same as in TLS:
the public key of an SSH server can be replaced by a certificate signed by a CA that users who connect trusts. This makes it possible to trust a server on which you connect for the first time, exactly like what happens on the Internet with HTTPS (i.e. HTTP in TLS). This mechanism then replaces SSH's traditional Trust On First Use mechanism based on trust given to the server at the first connection, with its usual anxious message "The authenticity of host '...'' can't be established".
the public key of an SSH client can be replaced by a certificate signed by a CA that SSH servers trust. Thus, by providing this certificate and proving that it has the private key associated with its public key, the client can show the server that it has been authorized to connect, this client certificate mechanism also exists for HTTPS, it is for example one of the possible authentication means on the Vault API (described here). In the case of SSH, this mechanism replaces the server-side requirement for a priori knowledge of the client's public key through the authorized_keys file.
The major difference between TLS and SSH certificates is the system of certification chain which is not existing in SSH.
For more details on SSH certificates, this page describe its format. In summary, this format must contain a validity period for the certificate and principals for which it is valid (usernames in client certificate mode and hostnames in server certificate mode). In addition to these mandatory elements, there are optional fields that could allow you to restrict the use of the certificate (critical options) or on the contrary to increase their authorizations (extensions), these two types of additional fields are described at the end of the document in a section with the same name.
The optional restrictions that are available are:
force execution of a command, which makes it possible to provide a certificate allowing only the execution of a very specific command on the server concerned
restriction of source IPs allowed to connect. For example, certificates can be restricted so that they can only be used from the bastion
The additional rights that are available at the moment (and therefore disabled by default) are as follows:
the authorization of the forwarding
- of the port
- of SSH agent
- of X11 (for remote visualization of graphic applications)
the execution of the “~/.ssh/rc” file of the login account
the PTY allocation (i. e. having an interactive shell)
Add the “permit-pty“ extension will be needed to allow the user to use an interactive shell on the servers.
These optional fields correspond roughly to the options available in the files authorized_keys (described here), with some missing options such as the ability to fine-tune which ports can be redirected.
Configuring an access with the Certificate Authority mode
This time we will have to set up a CA type role. But before you can do that, you have to initialize this CA, i.e. create your SSH key pair. The public key can be retrieved and installed on the server and the private key will remain in Vault without any way to extract it.
$ vault write ssh/config/ca generate_signing_key=true
Once this command is executed, Vault will have a private signature key that it will never disclose and a public key that can be retrieved without authentication, for example with the following cURL command:
$ curl 'https://vault.internal:8200/v1/ssh/public_key'
Now that our CA is initialized, we can create our roles and start using them to sign our keys. A role of type CA can be created as follows:
$ vault write ssh/roles/ca_web - <<'EOH'
{
    "key_type": "ca",
    "allow_user_certificates": true,
    "default_user": "web",
    "allowed_users": "web",
    "ttl": "5m",
    "max_ttl": "5m"
}
EOH
We just created a “ca_web” role that will allow people with access to it to sign their SSH public key ("key_type": "ca") to get a client certificate ("allow_user_certificates": true) with a default lifetime of maximum 5 minutes ("ttl": "5m" and "max_ttl": "5m"), that will allow to connect using the “web” user only ("default_user": "web" and "allowed_users": "web") to all machines that trust the CA of this SSH Secret Engine.
Here we have limited the lifetime of the certificate and the authorized user (which will be indicated in the valid principals of the certificate).
On the other hand, our role as it is, still gives the user complete freedom regarding the extensions he can request in his certificate. We can lock our role by adding additional parameters, first we add a constraint on the source IP (the IP of our bastion, 10.0.0.0.1):
$ vault write ssh/roles/ca_web - <<'EOH'
{
    "key_type": "ca",
    "allow_user_certificates": true,
    "default_user": "web",
    "allowed_users": "web",
    "ttl": "5m",
    "max_ttl": "5m",
    "allowed_critical_options": " ",
    "default_critical_options": {
        "source-address": "10.0.0.1"
    }
}
EOH
These additional settings tell Vault not to allow users to manage the critical options of their certificate ("allowed_critical_options":" ") and to systematically insert a critical options which must be connected from the bastion ("source-address": "10.0.0.1").
We will add parameters that allow the user to get a PTY, but nothing else, no port forwarding in particular:
$ vault write ssh/roles/ca_web - <<'EOH'
{
    "key_type": "ca",
    "allow_user_certificates": true,
    "default_user": "web",
    "allowed_users": "web",
    "ttl": "5m",
    "max_ttl": "5m",
    "allowed_critical_options": " ",
    "default_critical_options": {
        "source-address": "10.0.0.1"
    }
    "allowed_extensions": "permit-pty",
    "default_extensions": {
        "permit-pty": ""
    }
}
EOH
These additional parameters tell Vault not to allow users to ask for other extensions than permit-pty, the one which allow to allocate a PTY, ("allowed_extensions": "permit-pty") and to insert this default extension permit-pty ("permit-pty": "").
Once this role is setuped, a path “ssh/sign/[name of the role]” become available via the API. This path allows you to have your public key signed by Vault, within the limits of what is possible with the configuration of the role, for example :
$ vault write ssh/sign/ca_web public_key=@"$HOME/.ssh/id_rsa.pub"
The answer will contain a "signed_key" field corresponding to the SSH certificate file which will be stored in an "id_rsa-signed.pub" file for the next examples.
This certificate file can be inspected with the following ssh-keygen command:
$ ssh-keygen -L -f id_rsa-signed.pub
In this command, the -L option tells ssh-keygen that we want to inspect an SSH certificate and the -f option indicates the file to be inspected. Which will give us something like after execution on the console:
id_rsa-signed.pub:
        Type: ssh-rsa-cert-v01@openssh.com user certificate
        Public key: RSA-CERT SHA256:7yCwFqI21OEANvCtlAiZNyDMsSv2lV1EEaSnbQF4BD0
        Signing CA: RSA SHA256:HitN+Wc0hSKFBIQ0+Heczw4OFkBlrTLheuL7FVOCRn4
        Key ID: "vault-root-ef20b016a2..."
        Serial: 10734498250688175174
        Valid: from 2018-12-12T22:12:06 to 2018-12-12T22:17:36
        Principals:
                web
        Critical Options:
                source-address 10.0.0.1
        Extensions:
                permit-pty
This shows that all the default certificate settings are present:
5-minute lifetime
authorized login user : “web” (only value in “Principals”)
source address imposed on 10.0.0.1
authorized PTY allocation
Server-side implementation
All that remains now is to set up the server to verify that the certificate provided to it comes from Vault.
On the server side, you simply need to reconfigure the OpenSSH service so that it trusts the public key of the Vault CA and, any other form of authentication, i. e. passwords and authorized keys, can also be disabled.
If we consider that the public key of our CA Vault is in a file "/etc/ssh/user_ca.pub" it is enough to add the following line in the SSH server configuration (the file "/etc/ssh/sshd_config" most often) :
TrustedUserCAKeys /etc/ssh/user_ca.pub
You can then disable password authentication:
PasswordAuthentication no
ChallengeResponseAuthentication no
and also authorized keys:
AuthorizedKeysFile /dev/null
After a restart of the service, our server will be ready to accept any certificate issued by our CA.
Connect with a certificate
To use this certificate when connecting, simply add it to an "-i" parameter of our SSH client:
$ ssh -i id_rsa-signed.pub -i ~/.ssh/id_rsa web@server.internal
Or wth this SSH configuration in (~/.ssh/config)
CertificateFile id_rsa-signed.pub
First impressions
This mode of operation also has advantages:
it does not require any exchange between our server and Vault, only between the bastion and Vault. This reduces the attack surface on the latter
it allows to control finely what the user can do or not do once connected thanks to critical options and extensions
it uses on the client and on the server the already existing OpenSSH functionalities
On the other hand, despite its elegance, this solution has some disadvantages. During the certificate's validity period, it can be used on an arbitrary number of servers that trust the Vault SSH CA as many times as the user wishes. And these connections do not give rise to any log outside the logs of the system itself, which it is therefore important to keep and centralize outside the servers.
To mitigate the very large number of machines that can be accessed with a certificate, we can do:
Set up different CAs for different server sets. This is done by activating the SSH Secret Engine several times on different paths which will have different CA keys
Set up separate user names for each machine or group of machines. Thus if a role only allows to connect with the user "web.webserver" which only exists on web servers, he will then only have access to web servers.
Some policies to link user and role
To set up the last step of our access control, all that remains is to associate each of the users of our Vault with the access rights they have within the infrastructure.
As we have seen, a role allows you to define a set of rights on the infrastructure servers that the user can request from Vault in the form of a password or SSH certificate. Giving access rights on the infrastructure to a user consists in giving him access to particular roles in the SSH Secret Engine.
This access control to roles is done by creating policies, which will be assigned to our users when they authenticate with the Vault API. The principle of a policy in Vault is to restrict the API resources that the user can access and the interactions he can have with these resources.
For example, the "web_access" policy can be created by the following command:
$ vault policy write web_access - <<'EOH'

path "ssh/sign/ca_web" {
capabilities = ["update"]
}

path "ssh/creds/otp_web" {
capabilities = ["update"]
}
EOH
Allows the user to use the role "otp_web" OTP type and the role "ca_web" CA type. But to access the other resources of the Vault API it will need additional policies.
Take Away
In this article, we have seen how to give Vault the responsibility of controlling SSH connections to our infrastructure. This access management mode allows:
to have to do only an initial configuration of each server, reducing the maintenance load on the infrastructure code
to control users and their rights over the infrastructure centrally and securely through the Vault API
to take advantage of the possibilities offered by the Vault API in terms of interconnection with existing user repositories (the different Auth Methods) and fine permission management
All of this simply requires the installation of a binary and a reconfiguration of PAM in OTP mode or a reconfiguration of the OpenSSH server in CA mode. This avoids us to separate ourselves from the usual server access tools: SSH and its OpenSSH reference implementation.
Reminder of the advantages and disadvantages of the two operating modes of the SSH Secret Engine:
| OTP mode | CA mode |
| Good points<br><br>- fine control of target servers<br><br>- truly single-use access<br><br>- user connections reported in the Vault audit log log | Good points<br><br>- no access between servers and Vault<br><br>- control of actions for the user with certificate settings<br><br>- no additional software to install |
| The worst<br><br>- need for network access between all servers and Vault<br><br>- risk of spoofing on password verification with Vault<br><br>- third party tool to install<br><br>- use of passwords, less easy to automate<br><br>- lack of control over possible actions once connected | The worst<br><br>- difficult to fine-tune control of target servers<br><br>- lack of visibility on the use of the SSH certificate in the infra |
The main cost of this solution is the addition of a Vault server to the infrastructure and everything that this new component entails in terms of the need for security, high availability, audit and access control. This is a significant cost because your Vault server will become a prime target within your infrastructure, but it will at least have the advantage of using software designed for security.
In addition, some OpenSSH limitations persist, such as the impossibility of limiting the lifetime of an active SSH connection. This means that you can, for example, remain connected with an expired SSH certificate as long as the initial authentication took place while it was valid.