Confluent.io - Part 1: INTRODUCTION & SETUP
This article is part of a series designed to demonstrate the setup and use of the Confluent Platform. In this series, our goal is to build an end to end data processing pipeline with Confluent.
Disclaimer: While knowledge of Kafka internals is not required to understand this series, it can sometimes help clear out some parts of the articles.
INTRODUCTION
Let’s begin with these two questions: what is the Confluent Platform and why use it?
What?
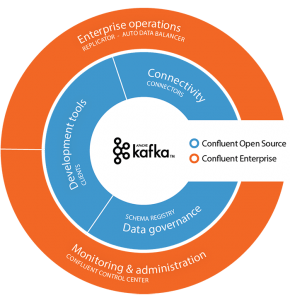
The Confluent Platform is a data streaming platform built around Apache Kafka, it offers an enterprise-ready solution to ingest and process data in real-time. While many of the core tools are open source and available freely, Confluent adds more components to help with data and platform management.
Why?
As depicted by Jay Krepps (Confluent CEO and Kafka Co-founder) in his article series dated from 2015 (part 1 and part 2), most companies information systems architecture look like this:
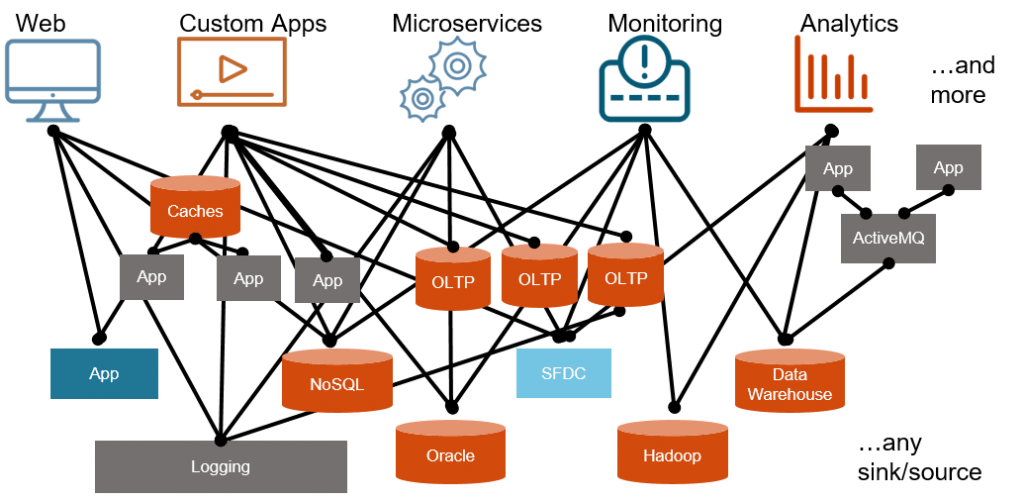
A number of different systems or services interacting with each other with various characteristics and operational needs. In this organisation, you would have a hard time to get a single unified view of the data available throughout the company. Moreover, it seems difficult to have a practical means to extract value from the data, like a business report for instance.
The first response to this increasing complexity came with Hadoop and data lakes, the first step towards data storage unification. Every single system producing data was supposed to feed a distributed storage like S3 or HDFS (part of Hadoop ecosystem) for further batch processing. It actually solves part of the problem by placing a central brick where data analysts, data scientists and other data-related professions can connect and get their raw material i.e data from. It acts as a single source of truth as long as everyone within a company is willing to pour their data in.
Hadoop is good at archiving and batch processing but doesn’t do so good when it comes to low latency data processing. It’s the reason why it’s usually coupled with some low latency streaming processing framework which will archive its output onto a distributed file system/object store. While this is a suitable approach, it remains difficult to manage and operate.
Confluent created its streaming platform with this in mind, keeping the part of the single source of truth but adding a way to access and process the data asynchronously and in real-time. With all systems connected to the streaming platform, the previous information system architecture would transform into this:
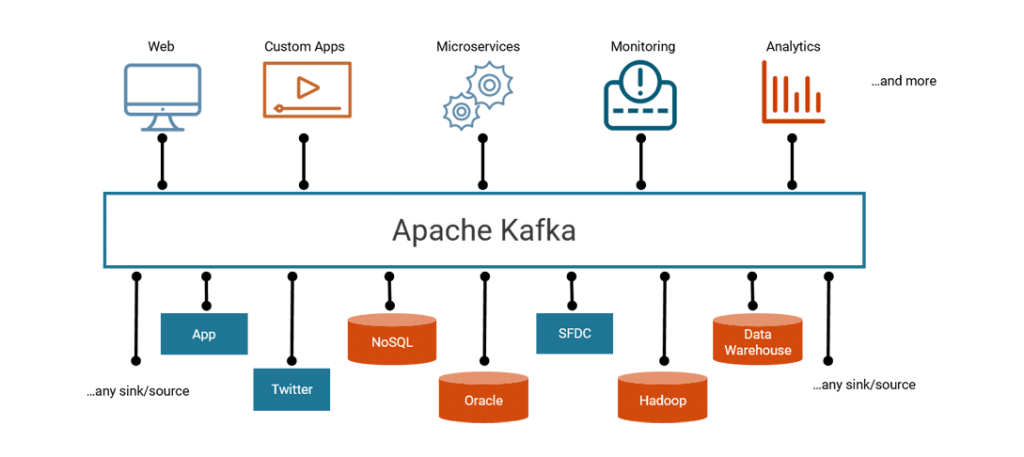
In this architecture, each legacy system would stream its data in real time to Kafka basically acting as a gigantic buffer serving applications data from all around the information system. Each tool would take its source from within Kafka ensuring both a single source of truth and a low latency access to the data. Of course, much like a data lake, it does not relieve you from operational needs but rather concentrates it on one platform which is easier to manage.
Recently released, Confluent Cloud could help you cut your operational costs even further.
Now let's jump to the implementation.
CONFLUENT PLATFORM SETUP
Requirements: we assume you have good knowledge about Kafka architecture and its internals if not, it would help to start by reading the documentation.
First of all, here is a short introduction of the tools we are going to install and use:
- The famous Kafka: a distributed and reliable message broker. Confluent platform has been built around Kafka by people previously working at LinkedIn.
- Kafka Connect: get data from/to other systems to/from Kafka. In Confluent, a table is viewed as a stream of changes. It uses CDC (Change Data Capture) to capture the logs (e.g an update will generate a line of a log) from a database and push them into Kafka.
- Kafka Streams: a lightweight distributed processing framework introducing new paradigms and tightly integrated with Kafka during execution.
- Confluent Schema Registry: an in-memory store allowing to persist and retrieve data schemas to publish and consume messages efficient to/from Kafka.
- Kafka Clients: libraries available in several languages to programmatically produce and consume to/from Kafka.
- Kafka REST Proxy: REST API to interact with Kafka clusters, mostly used to produce and consume to/from Kafka. Not covered in the scope of this series.
- Kafka Security: adds an extra layer of security to Kafka services providing authentication, authorization and encryption. Not covered in the scope of this series.
We’ll use AWS extensively along the way, the cost will be relatively low if you remember to stop your instance when you are not using it. You’ll need access to EC2 (to install Confluent platform), RDS (used as a data source system) and S3 (object storage). Of course, you can choose not to use AWS but it is more convenient i.e. we do not provide setup instructions for databases.
The following instructions are best suited for RedHat and CentOS, please follow the installation instructions if you plan on using another OS.
Spin up an EC2 RedHat 7 instance with 8GB RAM or more, at least 10GB disk and set up security groups rules so only you can access it through SSH at first.
SSH into the instance (username might change depending on the OS you chose)
ssh -i <path-to-keypair> ec2-user@<public-ip>
Install the JDK 8
sudo yum install java-1.8.0-openjdk-devel
Add Confluent's public key
sudo rpm --import http://packages.confluent.io/rpm/3.2/archive.key
Create a file named confluent.repo in /etc/yum.repos.d and add
[Confluent.dist] name=Confluent repository (dist) baseurl=http://packages.confluent.io/rpm/3.2/6 gpgcheck=1 gpgkey=http://packages.confluent.io/rpm/3.2/archive.key enabled=1
[Confluent] name=Confluent repository baseurl=http://packages.confluent.io/rpm/3.2 gpgcheck=1 gpgkey=http://packages.confluent.io/rpm/3.2/archive.key enabled=1
Clean your dependencies
sudo yum clean all
Install the platform
sudo yum install confluent-platform-2.11
At the end of the installation, you’ll find scripts to start and stop Confluent services in /usr/bin,
configuration files in /etc/<package> and jars in /usr/share/java/<package>
To ease control and visualisation of the components we are going to start, let's start by running the Confluent Control Center.
The Control Center is a web UI and is part of the enterprise edition of Confluent, it is designed to manage and monitor services. It uses specific Kafka topics to publish metrics later displayed in the UI which give you the ability to trigger alerts on metrics thresholds.
Since Control Center uses Kafka, we need at least one Kafka broker up and running so we'll need to start Zookeeper first
zookeeper-server-start /etc/kafka/zookeeper.properties &
Then edit /etc/kafka/server.properties and uncomment the following lines
metric.reporters=io.confluent.metrics.reporter.ConfluentMetricsReporter confluent.metrics.reporter.bootstrap.servers=localhost:9092 confluent.metrics.reporter.zookeeper.connect=localhost:2181 confluent.metrics.reporter.topic.replicas=1
Those properties set the Confluent Metric Reporter which collects and publishes metrics on Kafka clusters to its own topic named _confluent-metrics by default. A full list of properties and their description is available here.
Start a Kafka broker
kafka-server-start /etc/kafka/server.properties &
A Kafka broker is now running. Copy and modify Control Center properties setting the partition and replication numbers for the Control Center topics as well as for the monitoring topic where metrics about other topics are stored. An exhaustive list of properties can be found here.
cp /etc/confluent-control-center/control-center.properties /tmp/control-center.properties
cat <<EOF >> /tmp/control-center.properties confluent.controlcenter.internal.topics.partitions=1 confluent.controlcenter.internal.topics.replication=1 confluent.controlcenter.command.topic.replication=1 confluent.monitoring.interceptor.topic.partitions=1 confluent.monitoring.interceptor.topic.replication=1 EOF
Uncomment the following line to access Control Center from your laptop.
confluent.controlcenter.rest.listeners=http://0.0.0.0:9021
Finally, start Control Center
control-center-start /tmp/control-center.properties &
Set up a Custom TCP rule for port 9021 in the AWS Security group attached to your EC2 instance and start browsing at http://<aws-public-ip>:9021
Take a look at the Control Center and try to make sense of the metrics and features available to you.
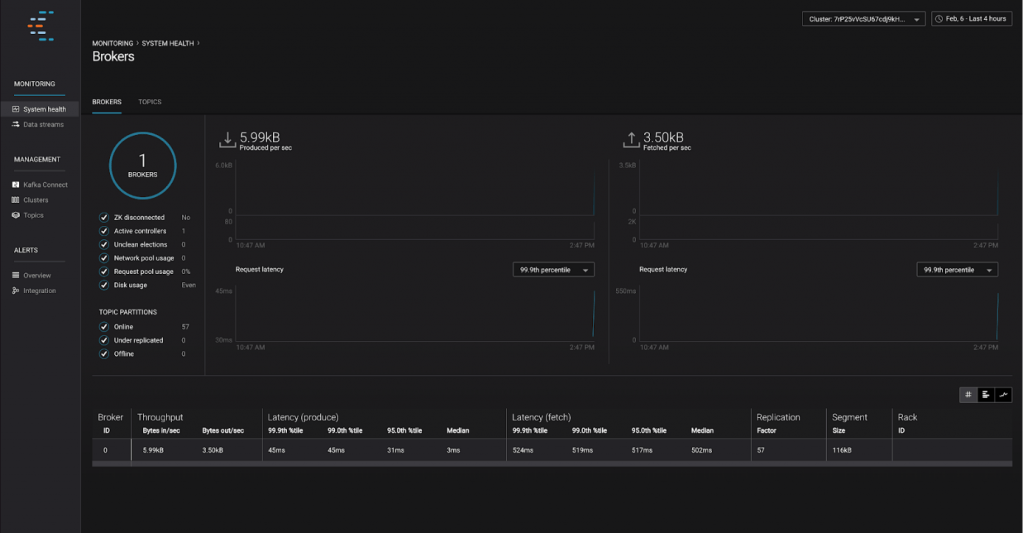
All set! You now have one Zookeeper node, one Kafka broker and Control centre running. You should see 1 broker available and a bunch of metrics about it in the bottom part of the screen in Control Center.
As you can see, it is easy to bootstrap a partly monitored platform in just a few commands.
In the next part of this series, we will start setup up a data processing pipeline.
Sources:
- Images: https://www.confluent.io/product/confluent-platform/
- Installation: https://docs.confluent.io/current/