Add Lint checks to Android Maven builds
Android offers a great tool to leverage the quality of apps : Lint. Lint can check missing translations, unused resources and other common mistakes in Android programming.
Nevertheless, up to now it was not possible to use Lint inside automated builds (i.e. on a Continuous Integration server like Jenkins). This situation just changed with release 3.5.1 of the Android Maven Plugin.
OCTO Contributed to release 3.5.1+ of Android Maven Plugin to offer integration of Lint as a simple maven goal : android:lint. The complete documentation of this goal can be found on the official documentation of the Maven Plugin goals. This articles provides a rapid overview of the android:lint goal's usage and parameters.
Create a new Android project and its maven configuration
If you know how to create an Android project using Maven, or already have such a project, you can go directly to next section.
Let's start a new Android project using acquinet maven archetypes. In a terminal, go to your working directory and type the following command :
mvn archetype:generate \
  -DarchetypeArtifactId=android-with-test \
  -DarchetypeGroupId=de.akquinet.android.archetypes \
  -DarchetypeVersion=1.0.9 \
  -DgroupId=com.foo.bar \
  -DartifactId=my-android-project \
  -Dpackage=com.foo.bar.android
In Eclipse, right-click in you package explorer view and select "Import" to import the project using the wizard "Import existing maven projects" : 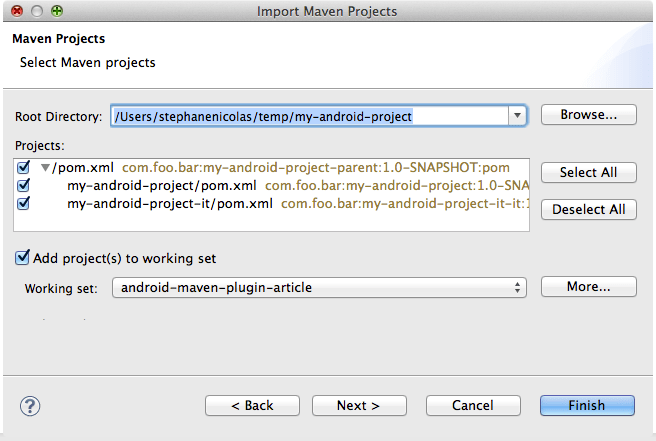
Using the latest version of Eclipse (Juno), you will have to hack the imported projects to build them inside Eclipse :
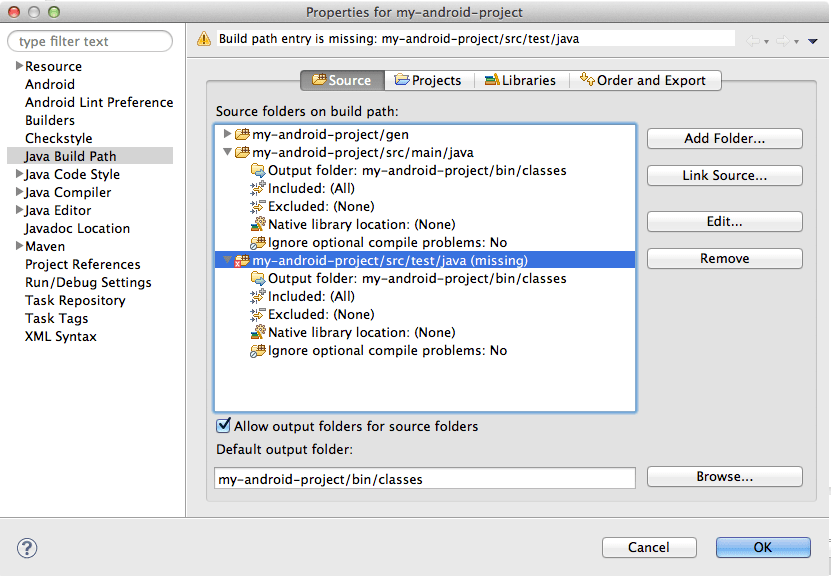
- Right-click on the first project
- go to properties >> Java Build Path >> Sources tab
- Remove the src/test/java folder
- Apply the same procedure to the test project
An alternative, for now, is also to create a src/test/java folder in your project. As you can see, everything got much simpler than 2 years ago.
You can now go back to your terminal and build the project (both the app and its tests) using maven :
>mvn clean install
...
[INFO] ------------------------------------------------------------------------
[INFO] Reactor Summary:
[INFO]
[INFO] my-android-project - Parent ....................... SUCCESS [0.143s]
[INFO] my-android-project - Application .................. SUCCESS [3.228s]
[INFO] my-android-project-it - Integration tests ......... SUCCESS [7.966s]
[INFO] ------------------------------------------------------------------------
[INFO] BUILD SUCCESS
[INFO] ------------------------------------------------------------------------
[INFO] Total time: 12.234s
[INFO] Finished at: Mon Jan 07 14:57:48 CET 2013
[INFO] Final Memory: 22M/206M
[INFO] ------------------------------------------------------------------------
If you reach that point, then everything is setup properly and you now have a working Android Maven project that will also build inside Eclipse.
Add Lint checks to your Maven build
First, check that you are using the right version of the Android Maven Plugin. This plugin is managed by the parent pom of your project. It should look like :
<project>
....
    <pluginRepositories>
        <pluginRepository>
            <id>oss.sonatype.org-jayway-snapshots</id>
            <name>Jayway OpenSource SNAPSHOTs on Sonatype.org</name>
            <url>http://oss.sonatype.org/content/repositories/jayway-snapshots/</url>
            <snapshots>
                <enabled>true</enabled>
            </snapshots>
        </pluginRepository>
    </pluginRepositories>
    <build>
        <pluginManagement>
            <plugins>
                ....
                <plugin>
                    <groupId>com.jayway.maven.plugins.android.generation2</groupId>
                    <artifactId>android-maven-plugin</artifactId>
                    <version>3.5.1-SNAPSHOT</version>
                </plugin>
                ....
            </plugins>
        </pluginManagement>
    </build>
</project>
When you are sure to use the right version, you can now configure the Android Maven Plugin in your application's project pom.xml file :
<build>
    <plugins>
        ...
        <plugin>
            <groupId>com.jayway.maven.plugins.android.generation2</groupId>
            <artifactId>android-maven-plugin</artifactId>
            <executions>
                <execution>
                    <id>lint</id>
                    <goals>
                        <goal>lint</goal>
                    </goals>
                    <phase>install</phase>
                </execution>
            </executions>
            <configuration>
                <sdk>
                    <platform>17</platform>
                </sdk>
                <lint>
                    <skip>false</skip>
                    <failOnError>true</failOnError>
                </lint>
                <undeployBeforeDeploy>true</undeployBeforeDeploy>
            </configuration>
            <extensions>true</extensions>
        </plugin>
        ...
    </plugins>
</build>
You will now see that Lint is executed during the install phase of a maven for your project. These 3 lines should be logged during your maven build :
> mvn clean install | grep -i Lint
[INFO] Performing lint analysis.
[INFO] Writing Lint XML report in <path to your project>/my-android-project/my-android-project/target/lint/lint.xml
[INFO] Lint analysis completed successfully.
Customizing Lint usage via the Android Maven plugin
The new android:lint goal of the Android Maven Plugin supports quite a lot of features, most of them are directly related to the lint program (use lint --help to display all lint options).
You can use either command line parameters in the form of android.lint.* or, inside the <lint></lint> section of your pom.xml file you can use the following options :
Controlling Lint invocation
skip=true|false
whether or not to execute lint. False by default.
failOnError=true|false
if true, any lint error (not warnings) will stop the build. Defaults to false. This flag is useful for Continuous Integration builds as it allows you to enforce lint usage.
Controlling Lint granularity
ignoreWarnings=true|false
if true, don't report lint warnings, only errors are reported. False by default.
warningsAsErrors=true|false
if true, all lint warnings will be treated as errors. Defaults to false.
Controlling Lint output
enableHtml=true|false
if true, lint will write a HTML report in the target/lint folder. False by default.
htmlOutputPath=<path>
path of the HTML report, only taken into account if previous property is set to true.
enableXml=true|false
if true, lint will write a XML report in the target/lint folder. True by default.
xmlOutputPath=<path>
path of the XML report, only taken into account if previous property is set to true.
Controlling Lint input
As usual : using lint, you can use a file named lint.xml at the root of your project to define the different level of severity of lint issues. This file will also be taken into account by the Android Maven Plugin.
enableSources=true|false
if true, lint will check the project's source folder. True by default.
sources=<path>
path of the folder of the sources folder of your project. Defaults to ${project.build.sources}
enableClasspath=true|false
if true, lint will check the byte code of your project's classes. False by default.
classpath=<path>
path of the folder of the classes of your project. Defaults to ${project.build.outputDirectory}
enableLibraries=<path>
if true, lint will check the byte code of your project's dependencies. False by default.
libraries=<path>
path of the jars of the libraries of your project. Defaults to all jars of dependencies with a scope that is not "provided".
Lint goal and maven phases
We must issue a warning here : the last two properties of the lint configuration are disabled by default. Using them is sensitive as they can have side-effects : both classes and libraries of a maven project are only present during certain phases of a maven build. For the classes, your project must have been compiled (during the compile phase). For the libraries, the dependencies' artifacts must have been resolved by maven (during the generate-sources phase of maven).
For this reason, we strongly encourage you to use the android:lint goal during the install phase of your application :
<build>
    <plugins>
        ...
        <plugin>
            <groupId>com.jayway.maven.plugins.android.generation2</groupId>
            <artifactId>android-maven-plugin</artifactId>
            <executions>
                <execution>
                    <id>lint</id>
                    <goals>
                        <goal>lint</goal>
                    </goals>
                    <phase>install</phase>
                </execution>
            </executions>
            <configuration>
                <!-- your lint config here-->
            </configuration>
        </plugin>
        ...
    </plugins>
</build>
Conclusion
The new android:lint goal of the Android Maven plugin will let you add quality checks to your Android projects. You can either use it on the command line or inside an automated built on a continuous integration server. You can even make your build fail if you have any lint error or any lint warning. We hope Android developers will welcome this tool and that lint checks will be more and more widespread in the Android community.
At OCTO, we are proud to have contributed to the Android Maven Plugin. We think that this new maven goal is a good way to enhance the robustness of our applications. However, something is still missing according to us : a lint plugin for Sonar in order to visualize all lint issues directly inside our Sonar dashboards. That's our next R&D target, anyone interested in coordinating their efforts can just leave a message below this post.