A look at Xamarin
In this article, we'll talk about Xamarin, a C# .NET tool enabling development of cross-platform mobile applications. We'll focus on the missing part: the reuse of native libraries.
What is Xamarin?
Xamarin is not only a product but also a company. The product addresses a common issue, the unified cross-platform development.
Xamarin allows to create native applications on iOS, Android and Windows Phone platforms. Its upside lies in the reuse of code, reducing the time to market.
Xamarin also provides its own development environment, Xamarin Studio.
With Xamarin, it's important to grasp that applications are run natively. Every iOS or Android APIs are available from C# code. It's true for push notifications, contacts integration, Bluetooth...
Sure, but what's going on in real life? Regarding code sharing, in particular?
Today, there are two different ways to build a Xamarin project.
- The first one consists of building a solution with an Android project, an iOS project, and a common project (created as a Portable Class Library).

This Portable Class Library (based on a curtailed subset of .Net features) will bear most of the reusable code. It will embed our "Models", our service access layer, ... Since 2014, Xamarin supports the MVVM pattern, famous among rich or Modern XAML-based applications developers. Actually, ViewModels and Models will be shared through this common library. For more inputs on the subject, Xamarin's documentation is fairly thorough.
- The second way is to use the Shared Project solution

In a Shared Project, we can develop reusable code while injecting target platform specificities. In a Shared Project, each file is copied into sub-projects (iOS, Android, Windows Phone) during compilation. Compilation directives will let us execute platform specific code. It's also possible to share views. Xamarin.Form relies on this kind of project to build very simple applications with little visual specificities. This feature applies to business applications, prototypes or applications with a strong visual identity requiring a single rendering on whichever platform.
Therefore, a Shared Project is less binding than a Portable Class Library (PCL), since the latter curtails access to the .NET Framework depending upon the PCL's targeted platform.
I wrote libraries on each platform, I don't want to rewrite everything for Xamarin, is that an option?
The answer is yes. Xamarin provided a feature to address this issue a year ago: Binding projects. Binding projects build a DLL (therefore usable with C#) that exposes iOS and Android native library APIs.
This kind of project is interesting for framework publishers, since they can release their native framework on the Xamarin platform within short delays and low cost.
The Android Binding Project
Xamarin.Android provides two ways to expose a java library:
- Use Java Native Interface (JNI) to directly call methods.
- Create a Java Binding Library project which exposes the library’s APIs in C#. The latter will be developed in this article.
The binding is implemented using 2 mechanisms:
the Manage Callable Wrappers (MCW): the MCW is a JNI bridge which is used at each call to the java library embedded into Xamarin C# code
The Android Callable Wrappers (ACW): conversely, ACW is a JNI bridge which is used each time Android runtime code (ART) calls “managed code”
To bind a java library, follow the following steps:
- Create a Java Binding Library project
- Add the jar as an “EmbeddedJar” and all its dependencies as “EmbeddedReferenceJar” (here we used jar files as example, but aar files can be binded as well with little more effort)
- Resolve binding related issues that may occur due to automated generation (you may need to delete nodes that shouldn’t be exposed)
This can be done by looking into 3 generated xml configuration files:
- EnumFields.xml: binds java int constants to C# enums
- EnumMethods.xml: binds java int return types and parameters to C# enums
- MetaData.xml: change the generated API (rename a namespace, hide irrelevant methods…)
For instance, we may want to hide a few classes within the jar. This is done with one line in the MetaData.xml file as follows
<remove-node path="/api/package[@name='com.octo.android']/class[@name='MyClass']" />
Once the binding project configured and compiled, you only need to add it as a reference from your Android Xamarin project. There are still several things to do in the MetaData.xml file, including renaming the methods parameters. Indeed, on a java method defined as such:
public static void log (string logLevel, string message)
The output will be:
public static void Log (string p0, string p1)
Not very user friendly for the developer who’ll use the SDK. To rename the method parameters, add these lines:
<attr path="/api/package[@name='com.octo.android']/class[@name='MyClass']/method[@name='log']/parameter[@name='p0' and @type='java.lang.String']" name="name">logLevel</attr>
<attr path="/api/package[@name='com.octo.android']/class[@name='MyClass']/method[@name='log']/parameter[@name='p1' and @type='java.lang.String']" name="name">message</attr>
For further information about java library (.jar) binding, you can refer to the Xamarin documentation: http://developer.xamarin.com/guides/android/advanced_topics/java_integration_overview/binding_a_java_library_(.jar)/
Now that you have a DLL embedding the jar, you need to add it to the Xamarin Android project. You can now access it as if it was a regular C# DLL!
To properly use your new library, you should obviously take a thorough look at its documentation. You need to make sure that the required methods are accessible, the configuration files are added and the resource keys are properly set in these files.
The iOS Binding Project
This kind of project requires to be developed on a Mac OS system (or at least to have one usable as a build host, as explained further). First, you’ll need the latest version of XCode, then Xamarin for Mac OS. Reversing this order may cause issues during the project compilation.
To bind a static iOS library, follow these steps:
- Create an iOS Binding Project
- Add the library (.a) to your project
- Declare the interfaces to be mapped in the ApiDefinition.cs file
Once the iOS library is added, you may need to edit the *.linkWith.cs file to import the library dependencies. For instance, this line imports the lsqlite3.dylib required by my iOS library:
[assembly: LinkWith ("[myLib].a", LinkTarget.ArmV7 | LinkTarget.ArmV7s | LinkTarget.Simulator, ForceLoad = true, Frameworks = "CoreFoundation CoreGraphics CoreLocation Foundation QuartzCore UIKit", LinkerFlags = "-lsqlite3", IsCxx = true)]
Once the dependencies are properly imported, you need to define the interfaces that should be made available from the resulting DLL. To do that, browse the .h file and add a C# interface in ApiDefinition.cs for each Objective-C interface found.
For example, from the following Objective-C interface:
@interface MyClass : NSObject
+ (void)init;
- (NSString *)reverse:(NSString *)value;
- (NSString *)concat:(NSString *)a and:(NSString *)b;
+ (NSUUID *)currentId;
@property bool allOk;
@end
The ApiDefinition.cs file mapping this interface will be:
namespace myLib.iOS
{
[BaseType (typeof (NSObject))]
public interface MyClass
 {

	[Static, Export ("init")]
	bool Init();

	[Export ("reverse:")]
	void Reverse(string value);

	[Export("concat:and")]
	string Contact([NullAllowed]string a, [NullAllowed]string b);

	[Static, Export("currentId")]
	string CurrentId { get; set; }

	[Export("allOk")]
	bool AllOk { get; set; }
 }
}
Here are a few tips to bear in mind when writing the binding:
The interface to be mapped must be decorated by a BaseType attribute having the interface type as a parameter (NSObject in our example, but it depends on the interface).
The interface methods, variables and properties must be decorated with the Export(method/property/variable name) property.
Some types need to be converted to C# (refer to Xamarin documentation Type mappings section)
The nullable parameters must be preceded with [NullAllowed], otherwise the code generated by Xamarin will raise an exception on null parameters without calling the iOS library method!
The methods without any parameter only need to be declared with their name (iOS wise) as an Export parameter: Export(“init”).
Methods with only one parameter, must be followed by “:” after their name: Export ("reverse**:**")].
The Objective-C syntax allows for a method name to be split by its parameters. For instance, the second method’s name above is “concat” and “and”. This method is mapped by including “:” after each part of the method name: Export("concat:and:")
Static methods, properties and class variables must be decorated with the Static attribute.
For further information about iOS library (.a) binding, you can refer to Xamarin documentation: http://developer.xamarin.com/guides/ios/advanced_topics/binding_objective-c/binding_objc_libs/ To use your now binded library, all that’s left to do is adding your binding project into your Xamarin iOS project to access all of the features mapped in the ApiDefinition.cs file.
I am not too comfortable with Mac OS, can I keep using Windows?
You can configure a Mac to delegate compilation from a Visual Studio on Windows.
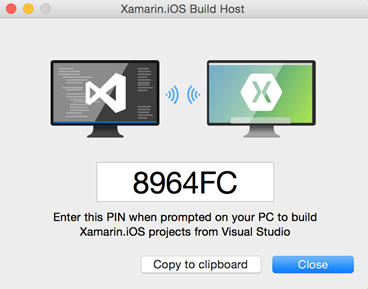
Indeed, Xamarin provides a Mac OS tool allowing for a Windows / Visual Studio developer to compile both binding project and Xamarin iOS project from his workstation. It’s called Xamarin.iOS Build Host. Once the service started on the Mac, the developer only needs to reference the Mac IP address from the Windows computer and to fill in the PIN code generated by Xamarin.iOS Build Host:
Conclusion
Thanks to Xamarin, the .NET developers used to Visual Studio C# can create iOS (iPhone, iPad, Watch) or Android (smartphone, tablet, wear) applications, and of course share code with the Microsoft ecosystem (Phone, Tablet). Therefore, you can choose Xamarin for a cross-platform development if your teams are already familiar with .NET. However, they won’t improvise themselves Android or iOS developers, and a considerable learning effort is still necessary to grasp each platform’s specificities.
