Taking .NET applications to the Cloud
One of our latest research and development projects has been an online banking application, which we use to demonstrate the latest tendencies in .NET development.
When it came to deployment, we could not find a suitable machine to publish the application. But wait, these days that’s not a problem any more. When you need to deploy a new application you can just publish it to the nearest cloud!
The choice obviously came to Azure platform. The question was just how painful the deployment will be? Will it take days before we adapt the application to run on the platform?
Actually the process of change was much more fluid than we thought and within an hour we were able to set up the necessary parts and run the application on the cloud.
But Azure offers much more than just a runtime platform for your web applications. It offers also several types of storage. One of these is Azure Blob storage.
And so after the painless deployment we thought: And what if we used Azure Blob storage to implement one of the new functionalities which was on our to-do list and which perfectly suites this kind of storage?
Hence this blog post which describes our experience with Azure and which will have two parts.
The first part describes how to take an existing .NET application and deploy it on the Azure platform. The second part which will be published soon will demonstrate how to make use of Azure Blob storage to develop simple content management functionality for the application (Electronic vault).
Before we dive into the technical details let’s just briefly introduce the Azure platform and it’s offerings, in order to better understand which parts of the platform will be described in this blog.
Azure platform overview
Windows Azure has been commercially accessible since February 2010 and offers a possibility for developers to build scalable applications using several different technologies and languages. Besides a runtime platform for different types of applications written in different languages, Azure offers also several other services. Here is a brief overview of the platform:
- Runtime platform- there are two types of applications which can be hosted:
- Web Role - prepared to host web applications
- Worker Role - prepared to host any application which do not handle HTTP request (eg. regular data treatment tasks)
- Hosting virtual machines
- Cloud based storage
- Azure SQL - relational database based on SQL Server 2008
- Azure NoSQL storage
- BLOB Storage
- Queue
- Table (key-value)
- Content Delivery Network
This is just a simple overview of the platform, much more detailed description can be found on the official Windows Azure page. Now when we have seen the services which can be used we will go on with the description of the application.
Architecture of the application
As it has been said already the application which we decided to deploy is a simple online banking application. It is composed of Silverlight client which consumes WCF services hosted on IIS 7 server and uses SQL Server 2008 as its main data store.
Let's take a look at the architecture and at the changes which will be introduced when moving it to Azure.
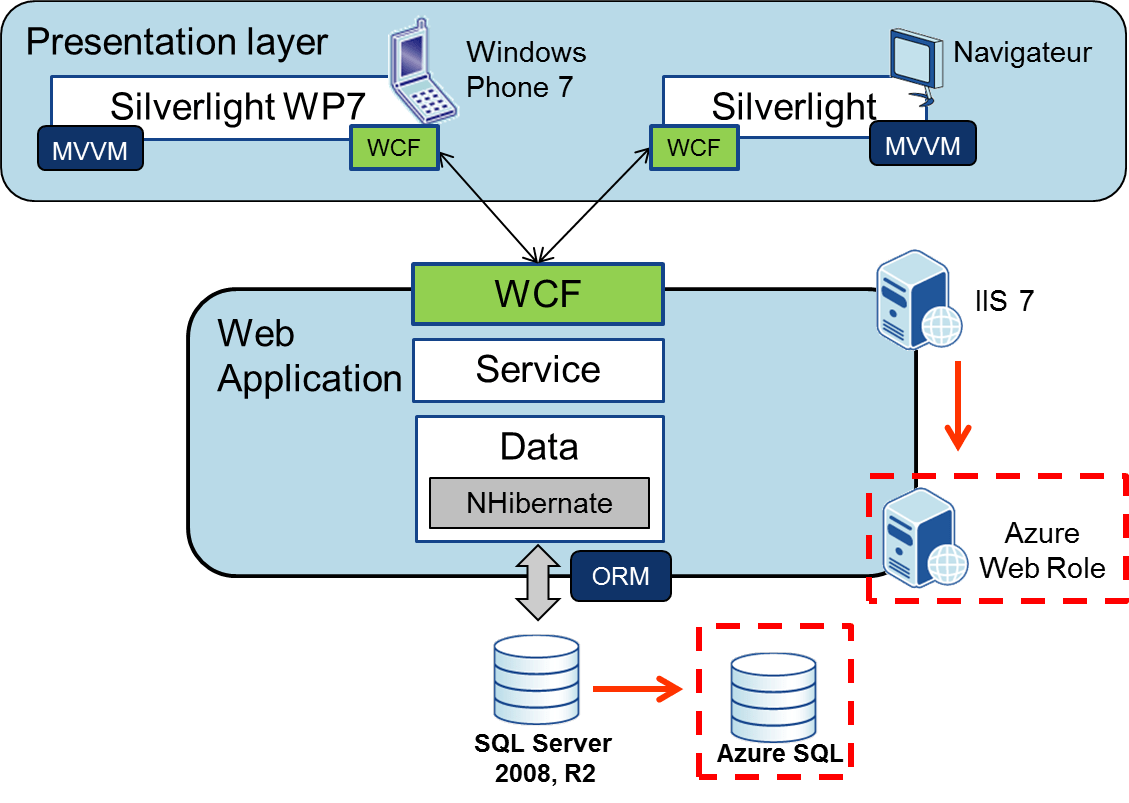
The red flashes in the diagram represent the migrations which will be done when changing to Azure.
To sum up what this diagram wants to say: the application has been so far hosted in IIS server and after the transition will be hosted by Azure Web Role. SQL Server will be changed for Azure SQL storage. In the second part of this article, we will show how to integrate Azure Blob Storage to this architecture.
As you can see from the diagram, the application uses NHibernate as ORM(Object Relational Mapping) to access the data. One of the questions we had was: will NHibernate work with Azure SQL? Well the answer is yes. Because Azure SQL is very similar to SQL Server 2008, no configuration changes are needed and the same data provider can be used. Just change the connection string and you are ready to go.
Understanding the architecture of Web applications in Azure
Let's take a closer look at the architecture of common Web application deployed in Azure.
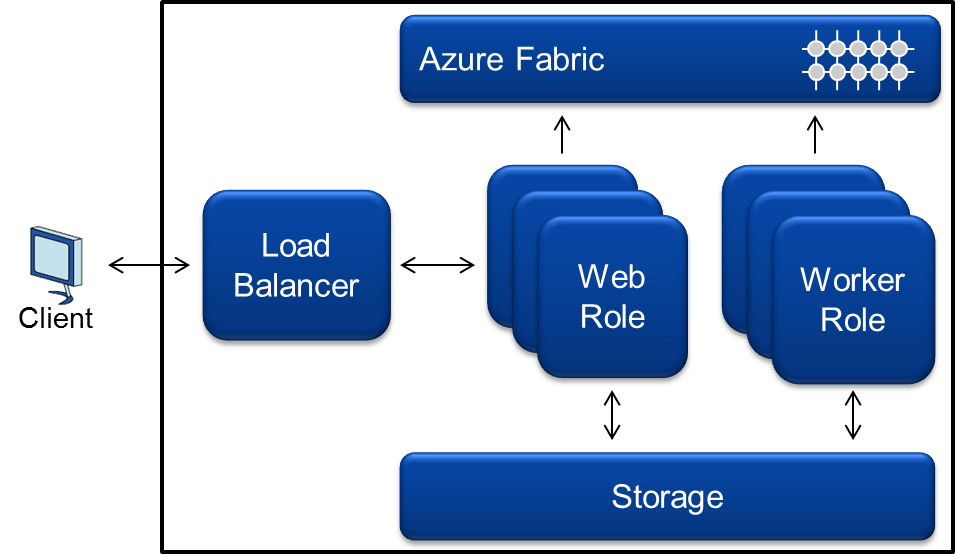
A typical web application can have one or several Input Endpoints. For a Web Role an Input Endpoint is HTTP port on IP address assigned by Azure. The traffic is always load-balanced even if there is only one instance of a Web Role. Actually the service level agreement of Azure states, that each application has to have minimally two instances - if not, than Azure will not guarantee the on-time stated in the service lever agreement. The number of instances which should be created can be easily changed in the configuration of the "cloud" project in Visual Studio.
In the diagram I have visualized several Worker Roles, actually our application does not contain any, but we can imagine simple console application turning regularly, making some background treatment on the data stored in the database. That type of application would be run by instance of Worker Role. You can notice, that I did not specify the type of the storage as you can use any type of the storage proposed by Azure.
Both the Web Roles and the Worker Roles are running on some node inside the Azure Fabric. Azure Fabric is the name for the grid network of Azure. This network is composed of interconnected nodes, each running Windows Server 2008, either dedicated or composed to create a virtualised environment.
Preparing the application for the Cloud
Before you start, make sure you have installed the Visual Studio 2010 Azure Toolkit. This will install the Visual Studio “Cloudy” project templates as well as the Azure Emulator.
Azure Emulator allows you to try out at your computer those features which are normally accessible only in cloud as well as to try out load balancing your application in several role instances. To be more specific: Azure Emulator does not contain Azure SQL, because you can "emulate" it by simply using your local version of SQL Server. On the other hand there are no local versions for the other types of storage (Blob, Queue and Table), so they are presented in the emulator.
In order to deploy the solution to Azure, Azure deployment project has to be added to the solution.
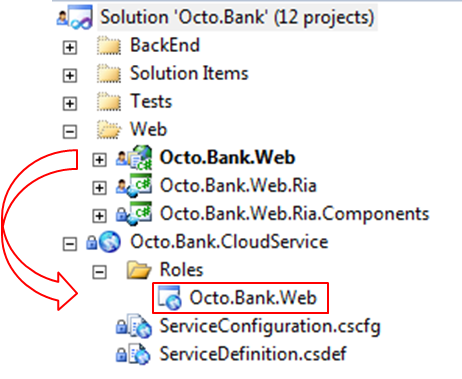
Octo.Bank.Web is the ASP.NET web application which exposes several WCF services and hosts the Silverlight client. Newly created project Octo.Bank.CloudService has one Role - previously mentioned Web project. If the project would have another roles (web or worker), they would be added to this list.
There are two configuration files (in XML format) which allow you to define applications endpoints, number and types of role instances which should be created and several other options. This configuration can be altered also by editing the Properties page of each role.
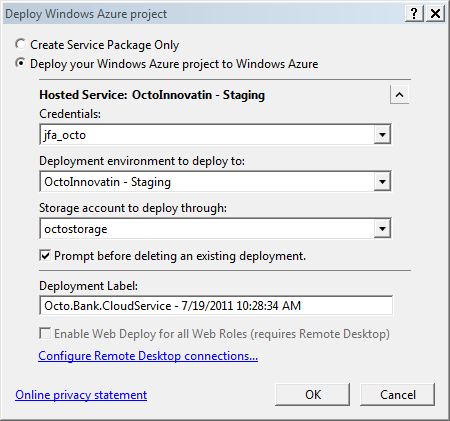
Visual Studio allows direct deployment to the Azure platform (by selecting Publish in the context menu of the Cloud project). The following dialog specifies the details of the publish: the credentials of the developer which is making the publish, the hosted service in which the application will be deployed and the storage account which will be used in order to upload the application package.
Before this can be done, several parts have to be configured in the Azure Management Portal.
Azure Management Portal
Azure Management Portal is a web application which allows the configuration of all Azure Services. Thus we can use Azure management portal to create and manage applications, databases and all available types of storage. This portal is available at this address: https://windows.azure.com/.
Connecting Visual Studio with Azure
In order for the developer to be able to directly Publish to Azure, he will have to generate a certificate on his development machine, which Visual Studio will use when uploading the files to Azure. In the second step, this certificate has to be added to the certificates list in the Azure Management Portal. The following image shows the certificates management part of azure portal. You can see that there are two certificates. Each developer who wants to use Visual Studio to interact directly with Azure needs to create and upload his certificate.

Moving the application
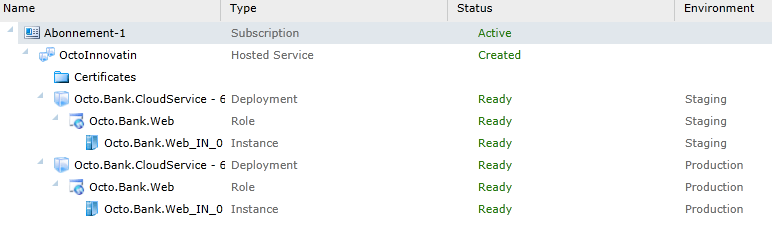
Before we publish the application from Visual Studio, we have to create a container for the application. This container is called Hosted Service. Each Hosted Service has two “deployments” : production and staging. The following screenshot shows the list of hosted services in management portal. As you can see there is one deployment having two environments (staging and production). Each environment has just one web role and there is only one instance for each web role.
Moving the database
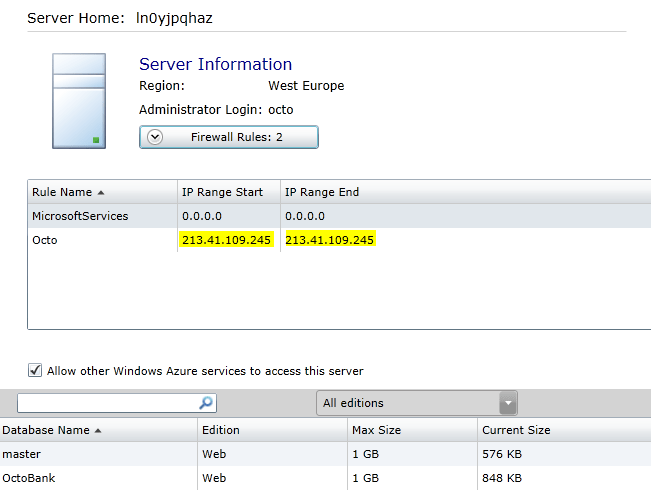
Before we start the move we have to Create new database in Azure Management Portal. When creating the database, the developer has to define which IP addresses will be able to access the database. Generally the database is accessed from Web or Worker role which are on the same Virtual Network created by Azure. However for the development purposes we have to sometimes access the database directly using SQL Server Management studio or other tool. For this situations Azure offers firewall which can be customized to control the incoming trafic. After the creation of the database a connection string is generated which can be used to access the database. The following screenshot comes from the database management portal, highlighting the firewall rule which allows remote access to the database.
If we have already a database in production, we have several possibilities to make the migration: export the database scripts and run them against the Azure SQL database or use on of existing migration tools. The complete list of possibilities can be found at this official page.
Conclusion
If your solution is well structured, then the deployment of an existing application to the Azure platform can be a question of several minutes. After creating the azure cloud project, preparing the database and the hosted service you can easily just interchange the connections strings and deploy to the cloud.
One of the missing pieces could be the possibility of automatic deployment from Team Foundation Server. This feature is not out-of-box ready to be used, however there is an API which allows deployment and configuration from .NET application or PowerShell script. This API can be than used to develop custom activity which can be added to the build process of Team Foundation Server. There is an existing opensource project which aims to deliver this feature, accessible at codeplex.
If you are interested in Azure and would if you would like to know more, wait for the second part of this article which will discuss Azure Blob Storage.